
Introduction
Before I start with useful tips and tricks for Blender I will briefly share with you my history with Blender.
A few years ago I had a serious addiction with Blender which is used to create 3D models and animations, I used it a minimum of 4 hours a day trying to recreate all kinds of things that crossed my mind, particularly nothing artistic but I was able to create structures, furniture and other types of objects based on reference images.
3D modeling was something that made me surprise myself of my own capabilities, every time a rendering was completed I felt very proud of my creation. In retrospect I wasn’t doing very amazing things but they were things I had made myself from scratch and that was amazing.
So much time and effort spent 3D modeling with Blender and texturing with Substance Painter paid off and today I can include those capabilities as part of my work as a freelance developer.
Below we are going to review 10 useful tips and tricks for using Blender that have helped me to speed up and improve the modeling process, allowing me to accomplish tasks faster or achieve better results.
#1 – Focusing the camera on the selected object in Blender
We start with a shortcut to center the view or even the rendering camera on the selected object. An extremely important trick because it is something that greatly improves the agility when using Blender. With this shortcut you can say goodbye to all that time trying to correctly place the camera on a 3D model or even on a vertex, the center of an edge or a face.
To use it simply select an object or an element of the mesh and press the dot on the numeric keypad, you will see how the camera is centered on the selected element and also, when rotating the camera, the selected element is the center of rotation.
#2 – Hide all objects or geometry except what is selected in Blender
If you are working on a Blender project that has many objects or an object that has a particularly complex mesh, it can be very useful to temporarily hide certain objects and leave visible only what you need to work with. With this simple shortcut you can easily hide selected objects in Blender and when you need to reveal all the hidden objects again.
To isolate elements in Blender simply select the object or mesh element you want to isolate and press SHIFT+H, this will hide all other elements that are not selected. To make all hidden elements visible again press ALT+H.
#3 – Tip to quickly parent and un-parent objects in Blender
When parenting objects one of them becomes the parent object and the other object or objects we choose become the children, this causes the child objects to be automatically affected by the transformations received by the parent object, for example a movement applied to the parent will cause all the children to move together, the same happens for rotations and scale changes.
To quickly parent one object or set of objects to another in Blender you have to go to the Outliner window where all the objects are located, select the ones you want to parent and then drag them to the object you want to parent them to while holding down the SHIFT key, optionally you can press ALT to keep the transformation of the parent objects.
#4 – Render image with transparency in Blender (works for Cycles and Eevee)
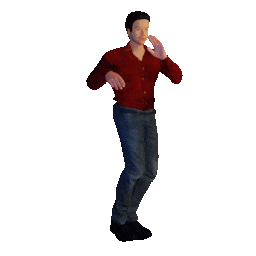
In many occasions it is very useful to render only the visible parts of a 3D model and make the rest of the rendering transparent, for example when you want to create a GIF of yourself dancing and place it in an article about Blender tips.
In the properties window go to the render properties tab and there go to the “Film” section, you will find a checkbox called “Transparent”, checking this will make the parts of the render where there is no 3D model transparent. Make sure you use an appropriate image format that supports transparency, such as PNG.
#5 – Display the normals of 3D models in Blender
The normals of a 3D model are a mathematical element that allows to know in which direction is pointing a particular face of a 3D model, sometimes in the modeling process certain normals can be inverted, that is pointing towards the inside of the 3D model and this can bring problems with shading, which means problems in the visualization of a material applied to the 3D model and also erratic behavior with light sources. Another important problem arises if we are creating these 3D models to use in a game engine like Unity, in this engine 3D models are rendered with “backface culling”, this means that if we have an inverted face in the graphics engine will be invisible and we will see through it, to solve this just correct the normals of the 3D model, but first we need to be able to see these normals.
To activate the normals of a 3D model it is necessary to be in EDIT MODE. Then in the upper right corner of the Viewport window click on the arrow that displays the “Viewport Overlays” window, almost at the end of it we will find the “Normals” section where we have 3 icons to display the normals, usually I choose to display them in the center of the faces. We can also adjust the length of the normals.
#6 – Know the number of vertices, edges and faces in our scene in Blender.
When we are creating 3D models we may be interested in knowing information about the geometry of the objects we are creating, for example how many vertices, edges, triangles or faces our model has, this can help us to determine if there is any problem with duplicate vertices and also keep track of how many polygons our 3D model has, if we are creating 3D models to use in a graphic engine like Unity it can be important to keep the amount of polygons within a reasonable number according to the model we are creating, especially if the application is for a mobile or virtual reality device, where there are certain limitations with the hardware.
To display information about the number of vertices, edges, faces and objects in Blender we go to the upper right corner of the Viewport window, click on the arrow that displays the “Viewport Overlays” window and check the “Statistics” box at the top of the window.
#7 – Applying the same material to other objects in Blender
When we select an object and we want to apply a color or give it a metallic appearance for example what we do is create a new material, which by default starts with the “Principled BSDF” Shader and we have different values to configure the material as we wish. But what happens if we have a second object and we want it to have the same material? We might be tempted to create a new material and configure it with the same parameters, it is even possible to copy the parameters of one material and apply them to another.
But there is a better alternative, in Blender we can make that two objects have the exact same material applied, that is to say that one or several material slots are pointing to the reference of the same material, in this way we can create a particular instance of a material that we could call “Pine Wood” for example and reuse that same material in all the objects that need the pine wood texture, this not only avoids that we have many unnecessary copies of a material but also allows us to modify the material and that the changes are applied automatically in all the objects where that material is used.
In this case the video is more illustrative but let’s try to summarize the procedure. With an object selected we go to the Materials tab (sphere icon with checkered texture), then if we click the + sign what we will do is create a new “Slot” for a material within our object, here there are two options, one is to click on “New” which creates a new instance of a material, completely independent of the others, the other option is to select an existing material (which interests us in this case), for this we click the icon to the left of the “New” button and select from the list the material we want to assign to the slot.
#8 – Show animation bones always in front of other objects in Blender
When creating animations with Blender using animation bones it is very useful to be able to see these bones at any moment even if they are hidden inside another object or obstructed by an object.
With the “Armature” object selected, go to the “Object Data properties” tab (which has a humanoid icon and is located above the tab with the bone icon), then go to the “Viewport Display” section and check the “In Front” checkbox.
#9 – Quickly create Edge Loops in Blender
When we gain some experience with Blender we come across the concept of “Edge Loop”, basically it is a set of vertices on a surface that are connected together and the last vertex of the set is connected back to the first one, the key is that of all the possible connections that can be drawn and that meet these conditions, the Edge Loop is like the loop that is connected in the most coherent way in relation to the other surrounding sets of vertices, it is a concept somewhat difficult to explain but it is easy to understand once we start working with them. An example of edge loop can be one of the rings that forms a sphere or a donut in Blender (the correct name is torus but it looks like a donut), each ring is a set of vertices connected forming a loop and this is an edge loop.
To quickly create an Edge Loop in Blender, select an object, go into EDIT MODE and press CTRL+R, then move the cursor to the part of the geometry where you want to add the edge loop, at this point you can scroll the mouse wheel to increase the number of loops to add or manually enter a number by keyboard.
#10 – Easily select Edge Loops and remove them in Blender
There is a quick way to select Edge Loops which allows us to apply transformations on the model, for example increase the size of a particular Edge Loop or move that Edge Loop in one direction and we can also get rid of that Edge Loop in a way that we keep the rest of the model intact, the latter is especially useful when we want to drastically decrease the amount of polygons of a 3D model to use it in a graphics engine like Unity for example.
To quickly select an Edge Loop in Blender we have to be in edit mode of an object, then hold Left ALT and left click on one of the edges that belongs to the Edge Loop that you want to select, if you click on a vertex of the Edge Loop you may select another Edge Loop that goes through the same vertex, so to be sure to select the correct one it is better to click on the edges.