This article belongs to the series about finding GameObjects and Components references from the scene in Unity, in this series we will see different techniques to find from a Script any object that is in the hierarchy in a certain scene in Unity, this is something very important to understand and know how to do it because if we have the reference of an object or component, we can access it and read any public data or execute any public function we need.
Here you have the playlist about finding the references in Unity, in that list we will be adding videos with more and more specific techniques. The following video talks about the technique shown in this article:
In the following video we see how to create a code to assign GameObjects and components in the inspector in UNITY.
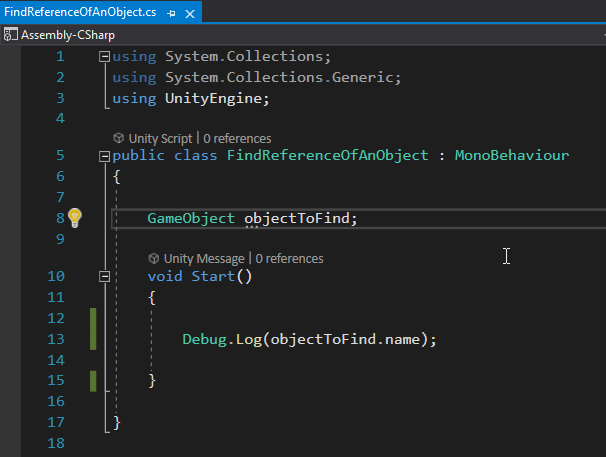
We start from a Script called “FindReferenceOfAnObject” in which we are going to find the reference of a certain GameObject that is in the scene in Unity, inside the Script we will use that reference to print its name in console with the instruction of the line 13 of the figure 1.
Fig. 1: Script we are going to use to see the different methods to find references of objects from the scene in Unity.
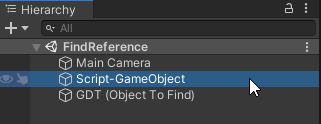
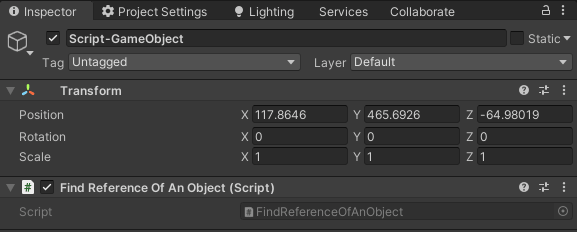
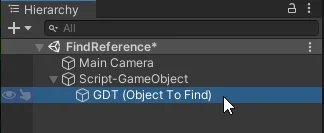
The hierarchy of the scene that we are going to use is composed by the GameObjects that are shown in figure 2, the object “Script-GameObject” is the one that has the Script in figure 1 assigned and it is the one that will be in charge of finding the references, in figure 3 you can see the inspector of this GameObject, where the Script is assigned.
The “GDT (Object to Find)” object seen in figure 2 is the object we want to find from the script, so if we succeed we should see the name of this object printed on the console.
Fig. 2: Hierarchy of the scene we are going to use to find the references of scene objects in Unity.
Fig. 3: Inspector window from a GameObject, the script to find references is assigned to this GameObject.
How to find a GameObject in the scene by its TAG in Unity
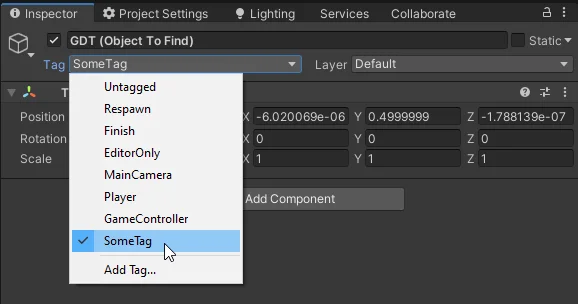
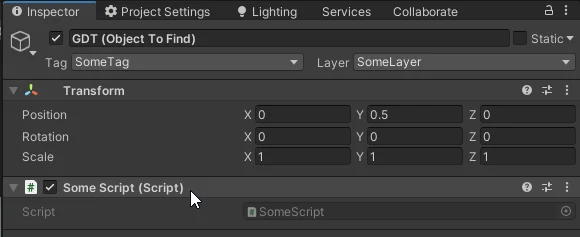
One of the elements that every GameObject has in Unity is a Tag, it is located in the inspector header, as we can see in figure 4. We can use this tag to find the reference of the GameObject of the scene in our Script.
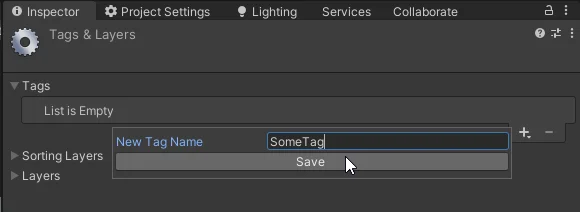
By default the GameObjects will have assigned the “Untagged” Tag, but we can assign one of the predefined Tags or create new Tags, in figures 4 and 5 I show how to create a new Tag in Unity.
Fig. 4: Tab to create a new Tag in Unity.
Fig. 5: Enter a name for the tag and save the changes.
Once we have created the Tag we have to assign it to the object, we select again the GameObject in the inspector, deploy the Tag drop-down menu and choose it, as shown in figure 6.
Fig. 6: The created Tag is assigned to the object to be referenced in the Script.
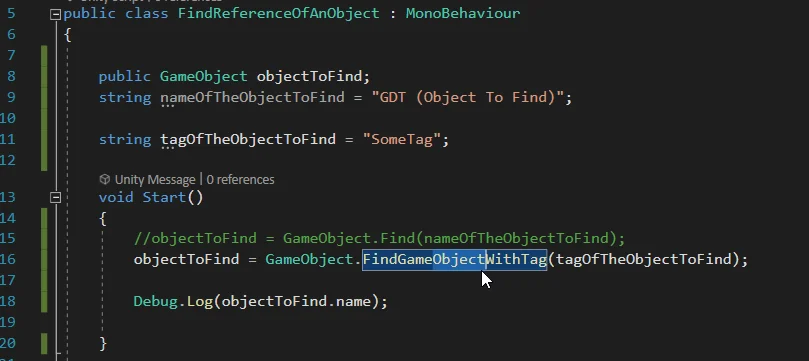
Now we are able to find that GameObject using the Tag, for this we execute the “FindGameObjectWithTag” method from the GameObject class and we pass as parameter the name of the Tag that we want to search. In figure 7 we see this instruction in line 16, notice that the name of the Tag has been defined in a String in line 11 and then in line 16 we pass as parameter that variable.
Fig. 7: Instruction to find the reference of a GameObject in the scene through its Tag.
When this instruction is executed, Unity will check all the objects in the hierarchy until it finds a GameObject that has that tag assigned, at that point it returns the object and it is stored in the “objectToFind” field. If there is no object with that Tag, the “objectToFind” field will have a null value.
To keep in mind, if we have more than one GameObject that has the same Tag assigned, Unity will return us the first of them that it finds in its registry, in this case some ambiguities could happen, we could obtain the reference of an object different from the one we want.
Introduction
This article belongs to the series about finding GameObjects and Components references from the scene in Unity, in this series we will see different techniques to find from a Script any object that is in the hierarchy in a certain scene in Unity, this is something very important to understand and know how to do it because if we have the reference of an object or component, we can access it and read any public data or execute any public function we need.
All the IMPORTANT information is summarized in the following TUTORIAL FROM MY YOUTUBE CHANNEL
We start from a Script called “FindReferenceOfAnObject” in which we are going to find the reference of a certain GameObject that is in the scene in Unity, inside the Script we will use that reference to print its name in console with the instruction of the line 13 of the figure 1.
Fig. 1: Script we are going to use to see the different methods to find references of objects from the scene in Unity.
The hierarchy of the scene that we are going to use is composed by the GameObjects that are shown in figure 2, the object “Script-GameObject” is the one that has the Script in figure 1 assigned and it is the one that will be in charge of finding the references, in figure 3 you can see the inspector of this GameObject, where the Script is assigned.
The “GDT (Object to Find)” object seen in figure 2 is the object we want to find from the script, so if we succeed we should see the name of this object printed on the console.
Fig. 2: Hierarchy of the scene we are going to use to find the references of scene objects in Unity.
Fig. 3: Inspector window from a GameObject, the script to find references is assigned to this GameObject.
How to find GameObject by Name in Unity
If we know the name of the GameObject in the scene we want to access we can use that information to find the reference in our Script. For that we use the “Find” method inside the GameObject class and we pass as parameter the name of the object we want to find, as shown in figure 4.
Fig. 4: Instruction to find the reference of a GameObject in the scene by its name.
When this instruction is executed, Unity will go through all the hierarchy looking for a GameObject with that name, if it finds it, it returns it and the reference remains in the variable “objectToFind”, but if it does not find it, this variable will have null value and it will give us the error of “NullReferenceException” if we try to access it.
To keep in mind, if we have more than one object that has exactly the same name, Unity will return the first one it finds in its registry, this can lead to ambiguities, i.e. we could get the reference of an object other than the one we are looking for.
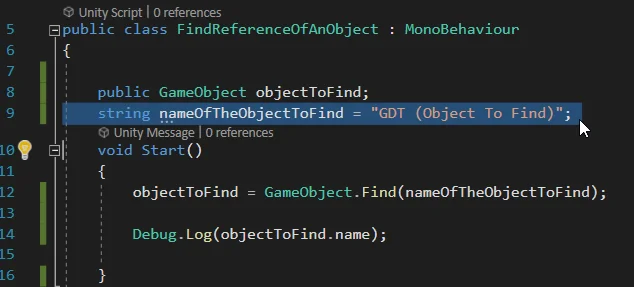
To avoid embedding data directly inside the functions, we can define a String with the name of the object to be found and then execute the “Find” function passing that String as a parameter, thus avoiding Hard-Coding, as shown in Figure 5.
Fig. 5: A string is declared with the name of the object to be found, to avoid hard-coding.
Introduction
This article belongs to the series about finding GameObjects and Components references from the scene in Unity, in this series we will see different techniques to find from a Script any object that is in the hierarchy in a certain scene in Unity, this is something very important to understand and know how to do it because if we have the reference of an object or component, we can access it and read any public data or execute any public function we need.
In the following video we see how to create a code to assign GameObjects and components in the inspector in UNITY.
We start from a Script called “FindReferenceOfAnObject” in which we are going to find the reference of a certain GameObject that is in the scene in Unity, inside the Script we will use that reference to print its name in console with the instruction of the line 13 of the figure 1.
Fig. 1: Script we are going to use to see the different methods to find references of objects from the scene in Unity.
The hierarchy of the scene that we are going to use is composed by the GameObjects that are shown in figure 2, the object “Script-GameObject” is the one that has the Script in figure 1 assigned and it is the one that will be in charge of finding the references, in figure 3 you can see the inspector of this GameObject, where the Script is assigned.
The “GDT (Object to Find)” object seen in figure 2 is the object we want to find from the script, so if we succeed we should see the name of this object printed on the console.
Fig. 2: Hierarchy of the scene we are going to use to find the references of scene objects in Unity.
Fig. 3: Inspector window from a GameObject, the script to find references is assigned to this GameObject.
Declaring the field with public visibility
The fields and variables declared within a Script can have three types of visibility: “public”, “private” and “protected”. Let’s consider only the first two cases, private and public visibility, in the first case the field declared as private will not be accessible from external contexts to the Script itself in which it is defined, while if it is declared with public visibility you can directly access this script from other Scripts. In Unity you can also see the public fields in the inspector.
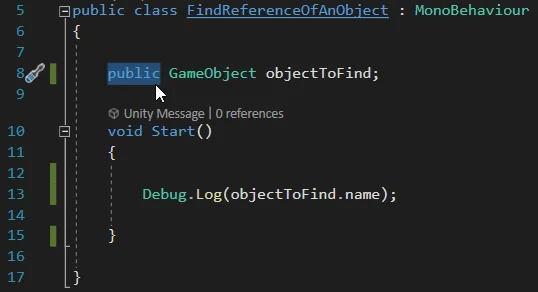
In Figure 4, line 8 we declare a GameObject field called “objectToFind” indicating public visibility by placing the word “public” in front of it.
Fig. 4: Declaration of a GameObject field with public visibility.
Figure 5 is a screenshot of the Inspector window of the GameObject that has the Script we are editing assigned, as can be seen, the field “objectToFind” appears in the inspector (something that was not seen in figure 3 with the Script in figure 1), which means that now we can manually assign the GameObject we want to store in the “objectToFind” variable, i.e. we can manually assign the object reference.
This can be done in two ways, one is by taking the GameObject from the hierarchy and dragging it to the field, while the other way is by using the circle icon with the dot that can be seen to the right of the field (in figure 5 or 6), this will display a window in which we can choose the object we want to assign.
Fig. 5: In the inspector we see that the public field appears.
Fig. 6: The object to be found has been manually assigned to the GameObject field in the inspector.
When entering the game mode we see the message in console that shows the name of the object that was assigned in the field, this occurs due to the execution of the instruction that is observed in figure 4 (line 13) and confirms that we have the reference of the GameObject, since we were able to use it to read its name.
Fig. 7: When entering the game mode we see the console message with the name of the object.
Alternative: Declare the field as private by including [SerializeField]
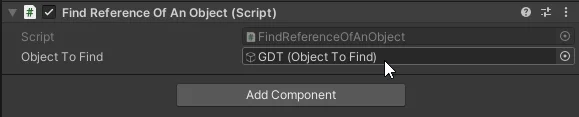
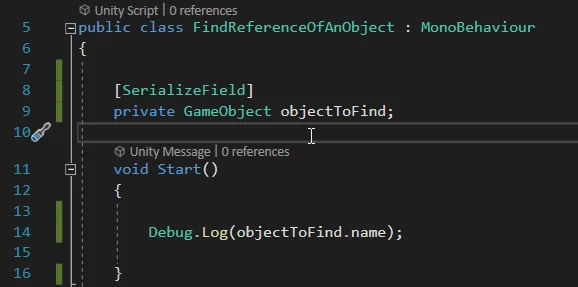
If you want to keep the variable with private visibility so that other Scripts cannot directly access that field, there is an alternative to make the field appear in the inspector, it consists of adding “[SerializeField]” before the declaration, as shown in figure 8.
Fig. 8: The field is defined with private visibility but serialized, this way is still visible in the inspector.
With this the variable “objectToFind” will be visible in the inspector and you can assign the object manually.
Introduction
In this article we are going to see how this Android Joystick prefab for Unity works and you can download the Unity Package to import and use in your project.
Download Joystick Prefab for Android
Below you can download a Unity package to import in your project, inside the package you will find all the necessary Assets to implement this joystick for Android.
In the following video I explain how to integrate this joystick for Android in your Unity project
In this article we are going to see a prototype of a teleportation system for Unity, which consists of a series of interconnected rings, when an object that has a Rigidbody component assigned to it enters through a ring, it will exit through the designated exit ring, in the process its speed is conserved but the direction of the movement will be the direction that the exit ring has.
In the following video you can see how to assemble a teleportation system of two or more rings using this prototype in Unity.
In the following link you can download the Unity Package with the teleportation system to import it in your own projects.
Introduction
In this article we are going to see different ways to find the references of GameObject and Components that are in the scene in Unity to use them inside a Script, this is something important because if we can access the object, we can manipulate it and any of its components as we need.
The following video is an introduction from a series about finding references in Unity, in this series I should different methods to get the reference of a GameObject or a component and use it inside a Script.
We are looking to find the reference of a GameObject that is in the hierarchy inside a Script and print the name of this GameObject on the console to check if it was successful. To do this we will use the Script shown in figure 1, simply define a GameObject type data called “objectToFind” in line 8 and then within the Start function print the name of this GameObject in console (line 13).
Fig. 1: Script we are going to use to see the different methods
The hierarchy of the scene that we are going to use is composed by the GameObjects that are observed in figure 2, the object “Script-GameObject” is the one that has assigned the Script of figure 1 and is the one that will be in charge of finding the references, in figure 3 you can see the inspector of this GameObject and the Script.
The object “GDT (Object to Find)” will be one of the objects we have to find, so if we are successful we should see that name printed on the console.
Fig. 2: Hierarchy of the scene we use to find the references
Fig. 3: Inspector of the GameObject that the script is assigned to find references.
Observation
If we enter the game mode at this point, in the console we will have an error of type “NullReferenceException”, because the object to which we want to read its name is a non-initialized object, ie with null state. In the figure 4 we see an example of the error that would appear in this case.
Fig. 4: When entering the game mode you get the error “NullReferenceException” because the field is null.
Method 1: Declaration of the field with public visibility
The fields and variables that are declared within a script can have three types of visibility: “public”, “private” and “protected”. Let’s consider only the cases of private and public visibility. In the first case, the field declared as private will not be accessible from contexts outside the script in which it is defined, while if it is declared with public visibility, this data can be accessed from other scripts and in Unity these fields will also be visible in the inspector.
In figure 1 we declared a GameObject type field called “objectToFind” without indicating its visibility, by doing this we are implicitly declaring it as private, in figure 5 instead we add “public” in front to indicate that it has public visibility.
Fig. 5: Declaration of a field with public visibility
Comparing figures 3 and 6 we see that now the field “objectToFind” appears in the inspector, which means that we can manually assign the GameObject we want to be in that field, in other words assign the object’s reference. This can be done in two ways, one is by taking the GameObject from the hierarchy and dragging it into the field, while the other way is by using the icon of the circle with the dot on the right of the field (in figure 6 or 7), this will display a window where we can choose the object we want to assign.
Fig. 6: In the inspector we see that the field declared as public appears.
Fig. 7: The desired object has been manually assigned.
When we enter the game mode we see the console message that shows the name of the object that was assigned in the field, this confirms that we have the reference of the GameObject and we can use it inside the Script.
Fig. 8: When entering the game mode we see the console message with the name of the object.
Alternative: Declare the field as private but serialized
If you want to keep the visibility private there is an alternative for the field to appear in the inspector, is to add “[SerializeField]” before the declaration, as shown in Figure 9.
Fig. 9: Alternative to defining the field with public visibility
Method 2: Find the reference of a GameObject from the scene by its name
If we know the name of the GameObject we want to find we can use that information to find the reference in our Script. To do this we use the “Find” method from the GameObject class and pass the name of the object we want to find as a parameter, as shown in figure 10.
Fig. 10: Instruction to find the reference of a GameObject of the scene by its name.
When that instruction is executed, Unity will go through the whole hierarchy looking for a GameObject with that name, if it finds it it returns it and the reference remains in the variable “objectToFind”, but if it does not find it this variable will have a null value and will give us the error of “NullReferenceException” if we try to access it.
To keep in mind, if we have more than one object that has exactly the same name, Unity will return the first one it finds in its register, this can lead to ambiguities, that is, we could obtain the reference of a different object from the one we are looking for.
To avoid embedding data directly into the functions what you can do is define a string with the name of the object you want to find and then execute the function “Find” passing as a parameter the string, as seen in Figure 11, that way we avoid doing hard-coding.
Fig. 11: A string is declared with the name of the object to be found and this avoids hard-coding.
Method 3: Find the reference of a GameObject from the scene by its Tag
One of the elements that all GameObject has in Unity is a Tag, it is in the header of the inspector, as we see in figure 12. We can use this tag to find the GameObject reference of the scene in our Script.
By default the GameObjects will have assigned the Tag “Untagged”, but we can assign one of the Tags that come predefined or create new Tags, in the figures 12 and 13 I show how to create a new Tag in Unity.
In the following video I explain how to find a GameObject by tag in Unity 6:
Fig. 12: Tab to create a new Tag in Unity.
Fig. 13: Give the Tag a name and save the changes.
Once we have created the Tag we have to assign it to the object, we select again the GameObject in the inspector and choose the tag from the tag window, as you can see in figure 14.
Fig. 14: The created tag is assigned to the object you want to find.
Now we are ready to find that GameObject using the Tag, for that we execute the “FindGameObjectWithTag” method from the GameObject class and we pass as parameter the name of the Tag we want to search. In the figure 15 we see this instruction in the line 16, notice that the name of the Tag has been defined in a String in the line 11 and then in the line 16 we pass as parameter the variable.
Fig. 15: Instruction to find the reference of a GameObject of the scene through its Tag.
When this instruction is executed, Unity will check all the objects in the hierarchy until it finds a GameObject with that tag assigned, at that point it returns the object and it is stored in the “objectToFind” field. If no object has that tag, the “objectToFind” field will have a null value.
To keep in mind, if we have more than one GameObject that has the same Tag assigned, Unity will return the first one of them that it finds in its register, in this case some ambiguities could arise, we could obtain the reference of a different object from the one we want.
Method 4: Refer to the same GameObject to which the script is assigned
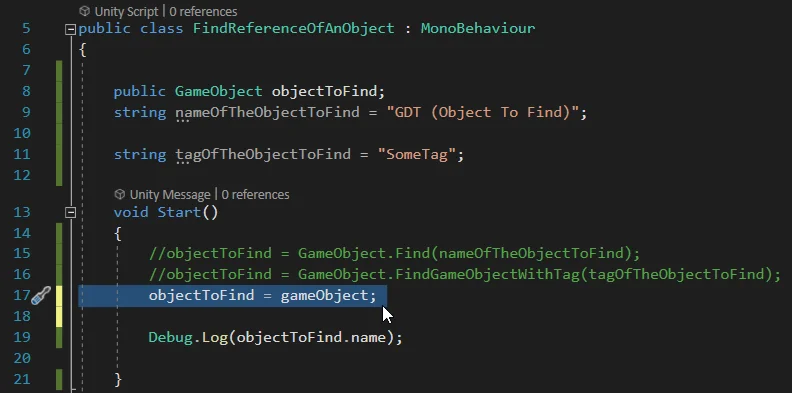
If the GameObject we want to use within our Script is precisely the same GameObject to which the Script is assigned the reference is already defined within an internal field of the MonoBehaviour class, the field is called “gameObject” (first letter with lower case), this name refers to the same object to which the Script is assigned.
Fig. 16: Instruction that assigns the reference of the GameObject to which the script itself is added
In this case it would not be necessary to define the field “objectToFind”, however we will initialize it as we have been doing until now. In line 17 we see that we assign “gameObject” to “objectToFind”.
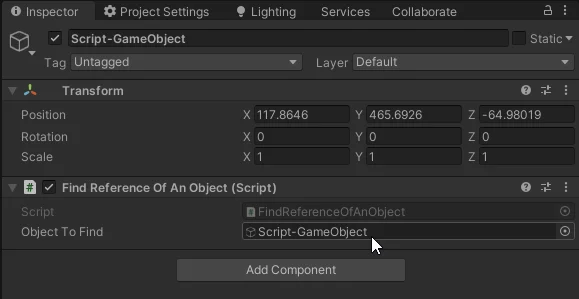
When entering the game mode we see in the inspector (Figure 17) that the object that is in the field “Object To Find” is the same object that is assigned to the script.
Fig. 17: When entering the game mode the reference that is assigned is the GameObject that has the Script.
Method 5: Find the reference of a GameObject that is a child of another GameObject
Maybe we are interested in obtaining the reference of a GameObject that we know is as a child of another GameObject whose reference we have, for example in figure 18 we see that the object to be found is as a child of the GameObject that has the script assigned to it, so if we have the reference of the father object we can access it and apply different actions on it, including accesing to its childs.
Fig. 18: The object we want to find is a child of the object the script is assigned to.
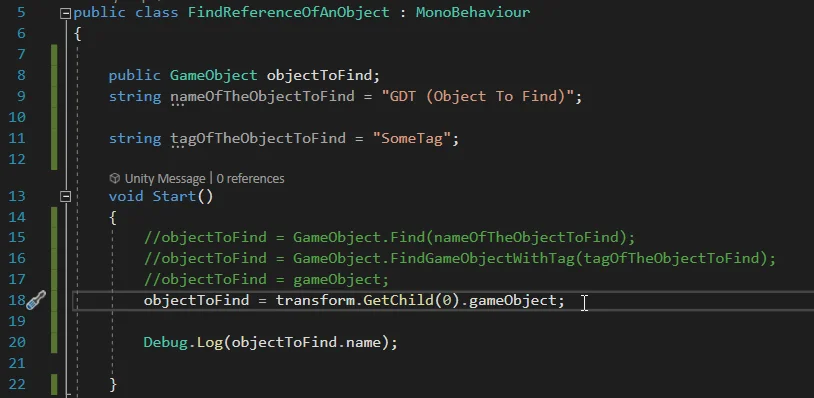
The “transform” field is another variable that is defined in all MonoBehaviour and refers to the Transform component of the GameObject to which the script is assigned.
We can use the Transformation to access the children that have that GameObject, using the GetChild() method with parameter 0 of the Transform class, this results in the transformation of the first child that has the GameObject to which this script is assigned, but as we are interested in obtaining the reference of the GameObject not its Transformation, we use the dot operator and the “gameObject” field.
The instruction is as shown in line 18 of figure 19.
Fig. 19: Instruction to find the reference of a GameObject that is placed as a child of another GameObject.
Method 6: Find the reference of a GameObject that has a specific component
If we know that the GameObject we are interested in finding has a specific component assigned to it, such as a “Camera”, “Rigidbody”, “AudioSource” component or a script we have created ourselves, we can use that knowledge to find the GameObject reference.
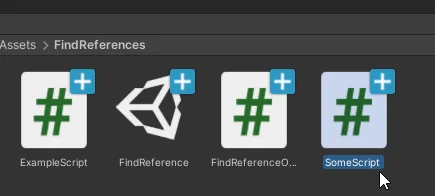
I will create a script called “SomeScript” and assign it to the GameObject we want to find, as shown in figures 20 and 21.
Fig. 20: Creating a new script called “SomeScript”.
Fig. 21: The script is assigned to the object you want to find.
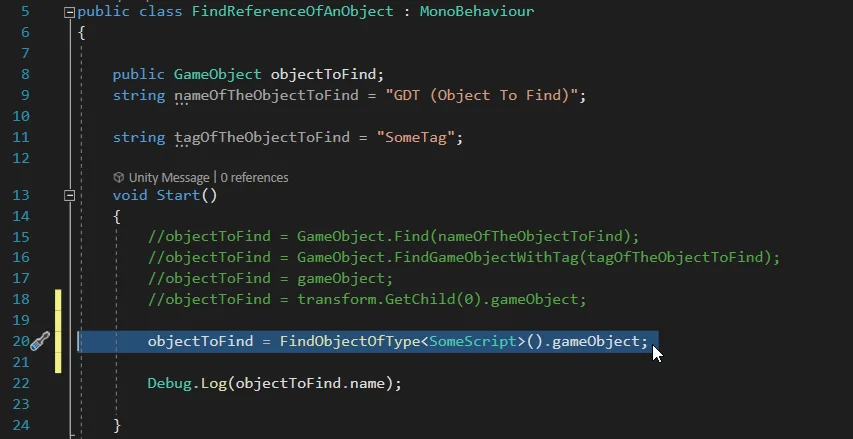
Using the instruction “FindObjectOfType()”, where T is the type of object we are looking for (in our case it is “SomeScript” type), we can find the reference of the “SomeScript” instance that is assigned to that GameObject, then using the dot operator we can access the GameObject to which that Script is assigned.
The instruction that does all this can be seen in line 20 of figure 22.
Fig. 22: Instruction to find the reference of the “SomeScript” type object and then get the GameObject to which it is assigned.
When this instruction is executed, Unity will check all the objects in the hierarchy and each one of its components until it finds a “SomeScript” type object, when it finds it it returns it as a result, but since we are interested in the GameObject to which that Script is assigned, we use the dot operator and access the “gameObject” field. If there is no object that has the “SomeScript” component assigned to it we will have a null reference error.
To keep in mind, if we have more than one GameObject that has assigned the component we are looking for, Unity will return the first component that it finds in its register, in this case ambiguities could arise, we could obtain the reference of a different object to the one we want.
Introduction
This time we are going to see a solution that I made in Unity, that allows us to show a message to the user with the “Don’t show again” option, if the user check that option, the message will no longer appear.
Download the Unity Package to import in your project
Below you can download a Unity package with all the necesary assets.
In the following video I explain how this solution works
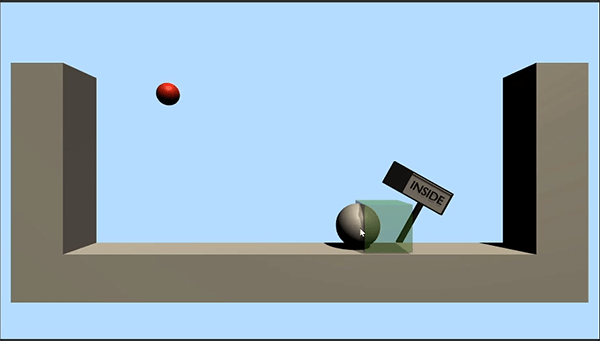
I made a simple prototype for Unity to show how to detect when an object enters inside the collider of another object and execute functions in that case.
Scene of the prototype that comes in the Unity Package
Download Unity Package
Below you can download the Unity package that when imported into your engine, you will recover the Assets we use and you will be able to test it on your own computer.
Please read carefully what I say below about the functioning of this prototype
I have created this prototype for you to understand how an action can be executed when we detect that a Collider enters inside another Collider in Unity.
THE EXPLANATION IS DIVIDED IN TWO PARTS, I did it this way because this is how I solve any problem using the Unity engine, after analyzing a problem and creating a plan to solve it, you have to take care of two things, the first one is the scene elements in Unity, that is to say create GameObjects, assign components and configure. The other part to take care of is the code instructions that solve the problem, but this is not possible if we don’t know which are the objects of the scene that we are going to use in our scripts.
Video #1: Configure Colliders as triggers in Unity
To begin with, we are going to analyze how things have to be configured in Unity to be able to detect that an object enters inside another object. It is necessary to correctly configure the Colliders of the objects and add Rigidbody components so that a Collider is able to work as a Trigger
IF YOU DON’T GET THIS PART RIGHT, NO MATTER HOW WELL YOU WRITE THE CODE, IT JUST WON’T WORK.
Once we made sure that we have correctly configured the objects in the scene, now we move on to the code part, in the following video you can see the OnTriggerEnter function that is executed when a Collider is detected by a Trigger, this concept can be used for many different things, in this case, when the character enters the trigger an object is turned on, a sound is played and an enemy appears in the scene:
Implementation
The main goal of this video is to help you understand how Unity’s collider detection system works, this will allow you to take better advantage of it according to your needs.
Most of the actions that occur in this prototype consist simply in activating and deactivating GameObjects of the scene and also components, for example the “enemy” that falls from the sky when we pass through a certain area is simply a GameObject that was inactive and we activate it at the moment we detect that the player enters the collider.
Here are two videos that explain how to activate and deactivate GameObjects from the scene and how to activate and deactivate components attached to GameObjects from the scene.
ABOUT THESE VIDEOS
Below you have two videos about the actions applied inside the prototype for the detection of an object that enters inside a Collider. In the first video we see how to ACTIVATE and DEACTIVATE a GameObject through code. In the second video we see how to ACTIVATE and DEACTIVATE components assigned to GameObjects through code.
Introduction
In this article we see how to make a character selection menu in Unity, analyzing a prototype that implements this system which consists in two scenes, the first one is like a main menu where you can switch characters, the second scene is like a game scene where you can play with the character you selected in the previous scene. In addition you can download the Unity Package to import it in your own project.
All the IMPORTANT information is summarized in the following TUTORIAL FROM MY YOUTUBE CHANNEL
Character Selection Menu – Unity Package for download
Below you can download the Unity package to import it into a project and get the functional prototype.
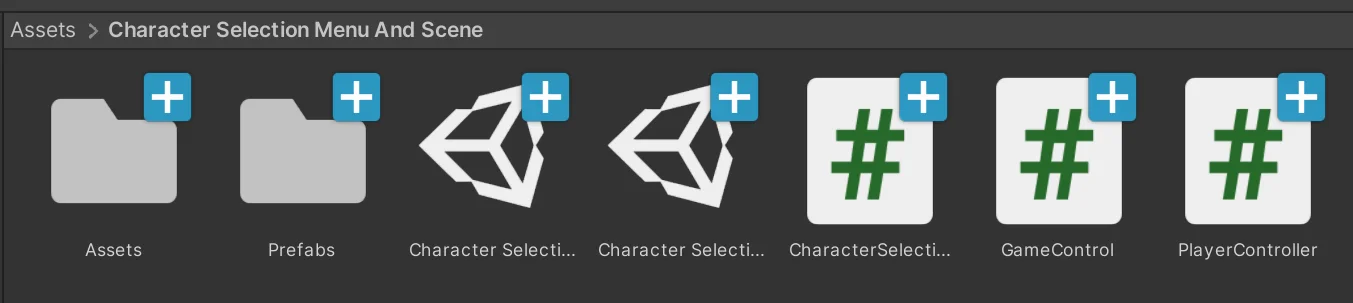
In figure 1 you can see the Assets contained in the package, there are two scenes, one for the character selection menu and another for the game scene where the character chosen in the menu appears.
There are three Scripts, CharacterSelectionMenu takes care of the logic of the selection menu, GameControl takes care of the logic of the game scene, i.e. placing the chosen character in the scene and the PlayerController Script allows to control the character in the game scene.
In the Assets folder are the Sprite sheets of the characters and the animations and in the Prefab folder the GameObject of the characters that appear in the menu and in the game scene.
Fig. 1: Assets that come in the character selection menu package for Unity.
Important – Prototype testing
When importing the Assets it is necessary to add the scenes from the selection menu and the game to the build, otherwise the button that changes to the game scene will not work. To do this we open the scene from the menu, go to File > Build Settings and click on the “Add Open Scene” button, then we do the same for the other scene. If both scenes are added you should see something like what you see in figure 2 in the Build Settings window.
Fig. 2: Make sure to add the scenes from figure 1 in File – Build Settings.
Scene from the character selection menu
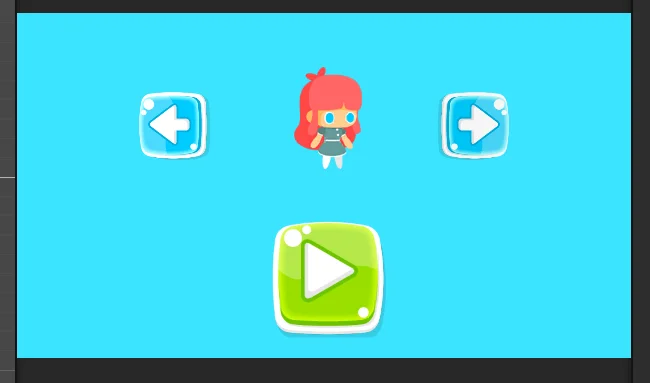
The selection menu scene is illustrated in figure 3, it consists of a character located in the center of the screen, two buttons to move to the next character or return to the previous character and a button to start playing.
Fig. 3: Scene from the character selection menu with buttons to change characters and start the game.
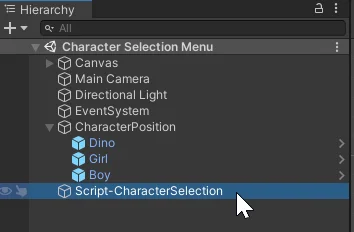
In the hierarchy we have an object that has a script assigned that has the control logic of the character selection menu, it is the object highlighted in figure 4.
Fig. 4: Menu scene hierarchy, the selected GameObject has the control script.
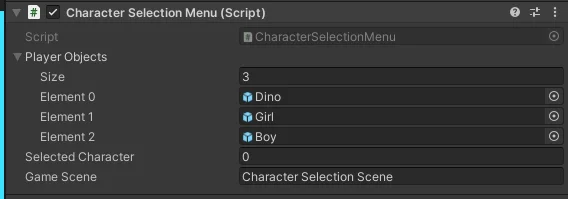
In the inspector we can see the script with its public parameters, we have an array called “Player Objects” that is used to store the different characters that the player can choose. You can indicate the size by modifying the “Size” value and then drag the objects of the characters to the fields that appear.
Fig. 5: Inspector window of the control script from the character selection menu.
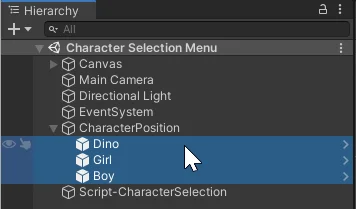
This prototype works in the following way, in the scene we place all the available characters, then we give the size to the array so it can store those objects and then we drag the objects of the characters from the hierarchy to the slots of the array.
In figure 6 we see the objects of the players that are assigned in the spaces of the array in figure 5.
Fig. 6: The objects of the available characters are in position in the scene.
Game Scene
When the green button shown in figure 3 is pressed, the game scene will load and the chosen character in the menu will appear, as shown in figure 7.
You can control the character with the WASD keys and to return to the main menu you can press Escape or the blue button in the corner.
Fig. 7: Game scene where the character chosen in the previous scene is used.
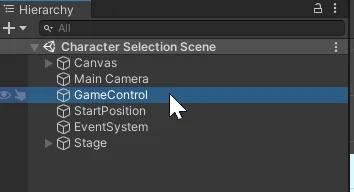
In the hierarchy of the game scene we have an object called GameControl that has assigned the “GameControl” script with the logic to make the chosen character appear in the scene.
Fig. 8: Hierarchy of the game scene, the GameControl GameObject has the control script assigned to it.
In the inspector we can see the parameters of this script, again we have an array of GameObjects for the characters.
In this case we are going to place the prefabs of the characters, that is to say GameObjects that we need to place in the Assets folder, the Script will be in charge of instantiating the chosen character. It is important that this array has the same size as the menu array and that the characters are added in the same order.
Fig. 9: Inspector of the GameControl script that takes care of placing the chosen character in the scene.
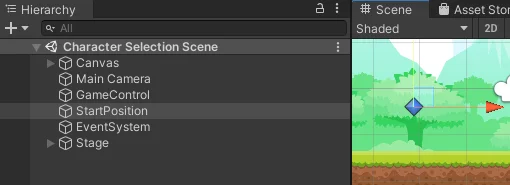
The chosen character will be placed in the position of the GameObject that we assign in the “Player Start Position” field in figure 9, in this case I have created an empty object called “StartPosition”, we can see it in figure 10.
Fig. 10: The highlighted GameObject indicates the position where the chosen character will appear.
Character Selection Menu Control Script
Let’s analyze the script that handles the logic of character selection.
Fields
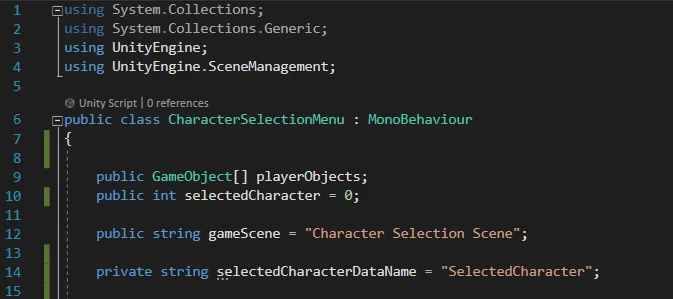
We start analyzing the fields defined in the script, in line 9 of figure 11 is defined an array of GameObjects called “playerObjects”, as it is defined as public will appear in the inspector. Then we have an integer variable that works as an index for the chosen character, with that variable we access the character in the array.
El string “gameScene” indica el nombre de la escena que hay que cargar cuando se pulsa el botón verde, es importante que el nombre coincida exactamente y se respeten mayúsculas, además la escena a cargar tiene que estar añadida en la ventana Build Settings.
The “gameScene” string indicates the name of the scene to be loaded when the green button is pressed, it is important that the name matches exactly and is case sensitive, also the scene to be loaded must be added in the Build Settings window, explained above.
Fig. 11: Fields of the Character Selection Menu Control Script.
Methods
Now let’s look at the methods that are defined in the Selection Menu Control Script.
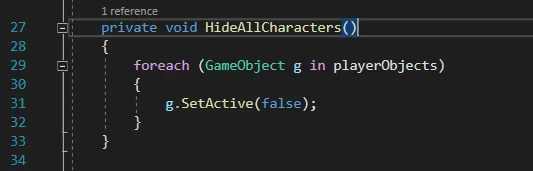
We have a method called “HideAllCharacters” that will be responsible for hiding all the characters in the scene, inside this function we loop through each element of the array executing the “SetActive” function with false as parameter on them. We analyse this function in the article about how to activate or deactivate GameObjects in Unity, you can also see the video here.
Fig. 12: Function to hide all the characters’ objects. This function is called at the start of the game.
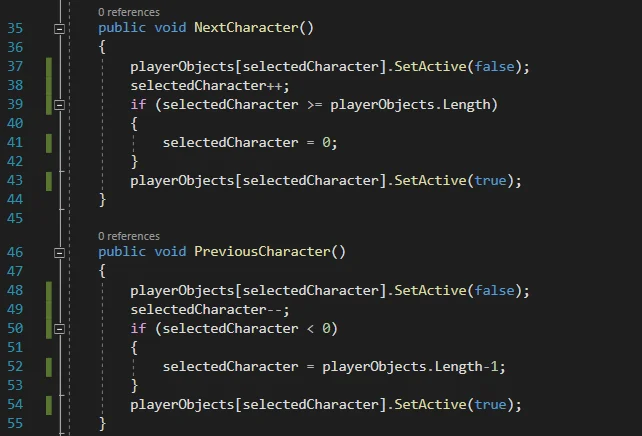
Then we have two public functions, one called “NextCharacter” and the other “PreviousCharacter”, these functions allow you to select the character, the first thing we do int hese functions is disable the currently selected GameObject, then we increase or decrease the index of the selected character, resetting it if it exceeds the total amount of elements or making it equal to the amount of elements minus one if the index is negative. Finally we activate the character corresponding to the given index.
Fig. 13: Functions to select the next or previous character respectively. These functions are executed by the menu buttons.
Then we have a public function called “StartGame” that will be called by the “Play” button of the menu, this function saves in memory the value of the index using PlayerPrefs, this is a way to pass data between scenes in Unity, having the index of the chosen character in memory, in the next scene that value is read and that allows to place the correct character. Then the LoadScene function of SceneManager is executed to load the next scene, to do this you need to implement the namespace UnityEngine.SceneManagement (line 4 of figure 11).
Fig. 14: Function to start playing, this function is executed by the green button in figure 3.
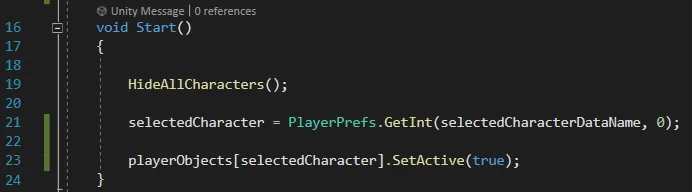
The Start function is executed when you start the game, in it the first thing we do is to hide all the characters using the “HideAllCharacters” function, line 19 in figure 15. Then we recover the value of the index stored in memory, that allows us to show the last selected character, in case there is no value in memory it will be initialized with the value 0.
Finally the GameObject of the selected character is made visible executing on it the SetActive function with parameter “true”, line 23 of figure 15.
Fig. 15: Start function in which the initial state of the character selection menu is set.
Game scene scripts to instantiate the chosen character
Now let’s analyze the Control Script that is in the game scene, this Script identifies the character that was chosen in the scene from the selection menu and places it in a certain position.
Fields
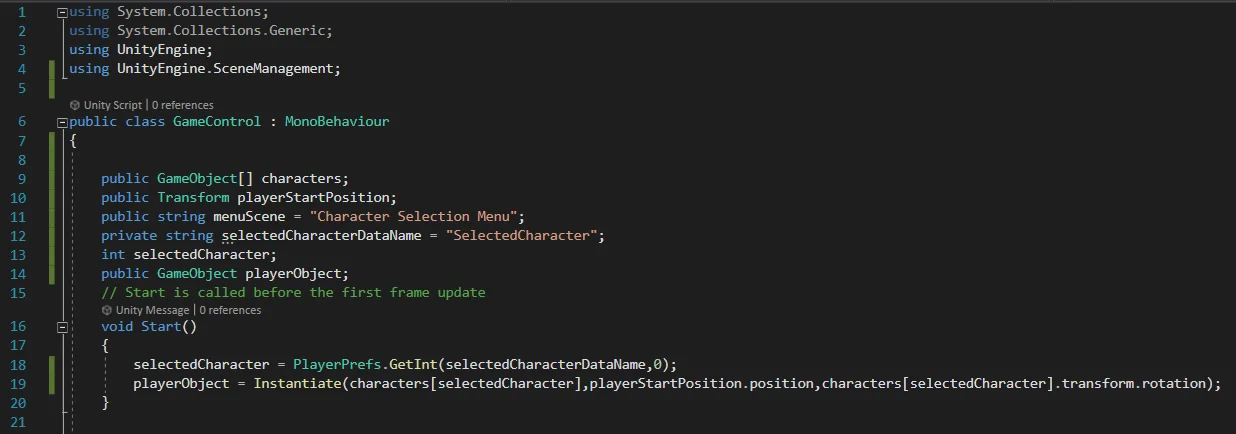
We start analyzing the defined fields, in the figure 16 we see a fragment of the GameControl Script, in the line 9 we have a public array of GameObjects, this field appears in the inspector and there we place the prefabs of the characters, it’s important to respect the same amount and the order of the characters as they were defined in the selection menu.
On line 10 we have a public Transform component, here we will place the object that will indicate the position where the character appears. Then we have two strings, one with the name of the selection menu scene and another with the name of the data in memory where the character’s index is stored. In line 13 we define an integer variable to store the index value and finally, in line 14 we define a reference for a GameObject where we will store the character’s reference that we will place in the scene, in case we need it later.
Fig. 16: Fields and Start function of the GameControl Script in the game scene.
Methods
In figure 16 we see the Start function that is where the stored value in memory is read using the PlayerPrefs class and in the next instruction the character is instantiated, that is, we create it and place it in the scene.
Then we have a public function called “ReturnToMainMenu” that when executed loads the scene from the character selection menu, we can see it in figure 17. This function will be called by the blue button in the game scene, you can see it in figure 7. Also this function is executed when you press the “Escape” key, as we can see in line 27 of figure 17.
Fig. 17: Update function and function to return to the main menu, the last function is executed with the escape key or by pressing the button on the graphic interface.
Introduction
In this article I will show you how to modify variables gradually over time, this has many applications, for example fade out the screen for a transition effect, gradually lower the volume in Unity, gradually change from one color to another, among many other applications.
In the following video we see how to Gradually change a variable in Unity and we talk about Time.deltaTime
Below you can download the Unity package with the Assets I use in the video.
Introduction
In this article we see a solution to fade out the screen in Unity, which you can download, import and drag into the Canvas of your Unity project to use it.This solution is highly customizable and you can also use images to perform the fade in/fade out effect.
Download this solution
Below you can download this Unity Package to import in your project, inside the package you will find scripts, a prefab and a scene with an example.
All the IMPORTANT information is summarized in the following TUTORIAL FROM MY YOUTUBE CHANNEL
Creating realistic transparent materials in Unity is essential for glass windows,bottles, and other see-through objects. In this tutorial, you’ll learn two techniques:
Building a basic transparent shader that reveals objects behind surfaces
Using alpha textures for complex transparency patterns (like frosted glass or decals)
We’ve included visual examples and optimization tips to help your transparent materials look great while maintaining performance.
For a visual breakdown of this subject, you may find my video discussion helpful.
Below you can download a Unity package with all the Assets I use in an old video about this topic.
Elements to be used
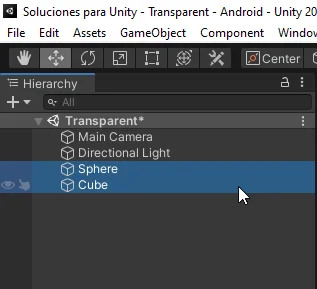
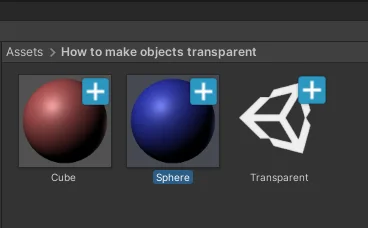
To show how to make transparent objects in Unity, I will use a cube and a sphere that will have a material applied to each one. In figure 1 we see the objects in the hierarchy and in figure 2 the materials that I have created for both objects.
Fig. 1: The objects we are going to use as an example
Fig. 2: The materials that are applied to the objects in the figure above.
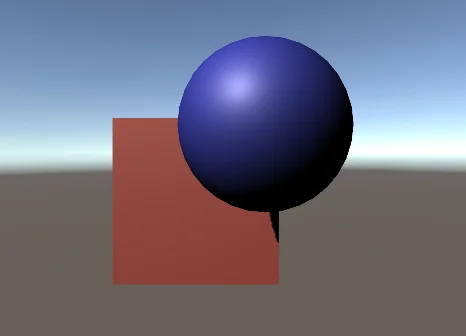
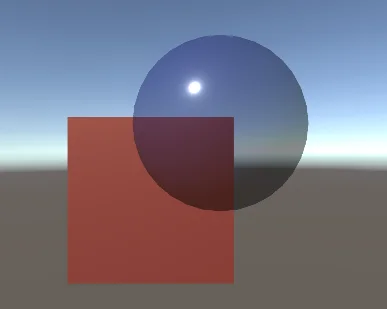
I will place the sphere in front of the cube, this will allow to know if the material of the sphere is transparent.
Fig. 3: I place the sphere in front of the cube to show the transparency.
Steps to create a transparent material in Unity
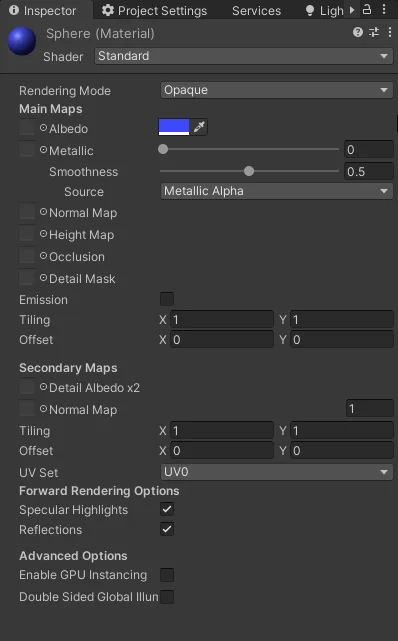
1. We select the material we want to make transparent to visualize its parameters in the inspector. The material I am using is the Standard Shader that can be created in Unity, in figure 4 we see its parameters in the inspector.
Fig. 4: The inspector of the blue material in the figure above, a standard material.
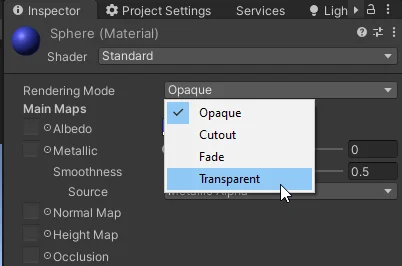
2. We changed the rendering mode from opaque to transparent, as shown in figure 5.
Fig. 5: We change the rendering mode to transparent.
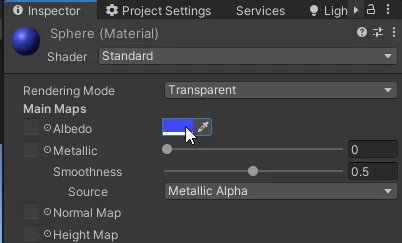
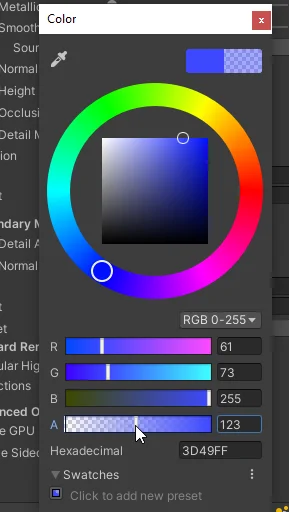
3. We modify the Albedo color of the material according to the color we want and decrease the alpha component until we achieve the desired level of transparency (figure 7).
Fig. 6: We change the color of the material.
Fig. 7: We decrease the alpha of the color to achieve transparency.
Results
In figure 8 we see the result, the material of the blue object is transparent and allows to see what is behind.
Fig. 8: The material now allows you to visualize what is behind it.
If you want to achieve a material similar to glass you can adjust the parameter “Smoothness”, this will make the material smoother and more similar to glass.
Fig. 9: We increase the “Smoothness” parameter.
Fig. 10: The material now looks more like glass.
Introduction
This solution for Unity consists of a script that can be assigned to any GameObject in the hierarchy and will produce a customizable rotation animation and also a translation movement according to the parameter settings in the inspector.
The movement is produced using a sine function, in the inspector you can adjust the values of amplitude and frequency.
Download the Unity Package: Rotation-Translation script
🟢 How to make a rotation-translation animation in Unity using this package
In the following video you can see examples on how to make a rotation animation in Unity using the package you can download in this page.
1. Download and import the Rotation and Translation Animation Package.
2. Select the GameObject to which you want to apply the animation.
3. Assign the “RotationTranslationAnimation” script to the GameObject by dragging it to the inspector or with the Add Component button.
4. Adjust the parameters to achieve the desired effect, these include the rotation axis, rotation speed, vertical movement amplitude and frequency.
Introduction
In this article, we’ll explore how to change the skybox in Blender by applying a texture to your scene’s background. We’ll specifically use an HDR texture as an environment map, which serves a dual purpose: creating a visually appealing backdrop and generating realistic lighting. HDR environment textures are particularly valuable for achieving photorealistic renders, as they project directionally varied colors and intensities onto your 3D models. This environmental lighting naturally highlights object geometry and creates compelling reflections, especially on materials with reflective properties.
For a visual breakdown of this subject, you may find my video discussion helpful:
First Step – Get HDR texture to use as a background texture
To modify the Skybox of the scene in Blender we will need special textures, one of the ones that can be used are the HDR (High Dynamic Range) textures, they are textures that have more information than the ones we commonly use and they are useful to illuminate scenes, because you can increase or decrease their intensity and the texture responds properly.
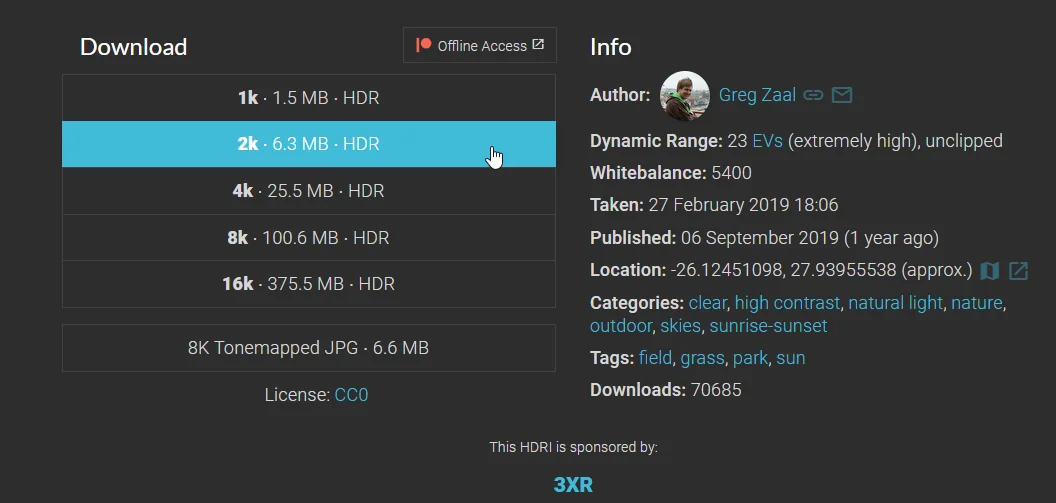
I usually download textures from the Poly Haven website, they have a quite interesting gallery with this kind of images, the downloads are free and you can also choose between qualities ranging from 1K to 8K textures, as you can see in figure 2.
Fig. 1: First you need to get an HDR texture, on the page there are different categories and they can be downloaded in different resolutions.
Fig. 2: In my case I will download a texture in 2K resolution.
Next steps to change the Sky texture in Blender
Next we are going to see how to modify the background texture in Blender in two simple steps.
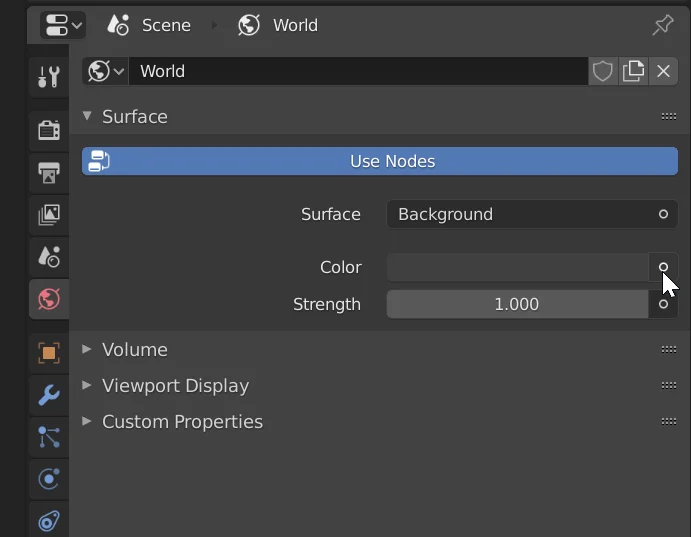
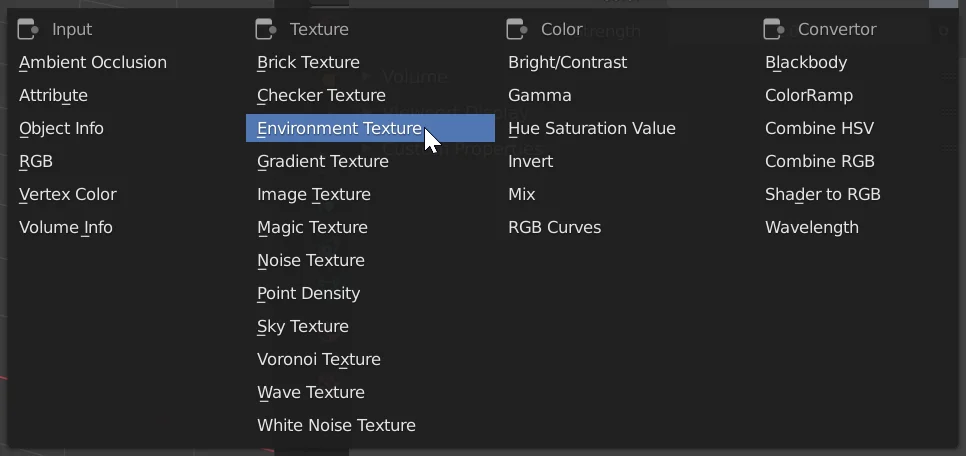
1. Go to the “World Properties” tab and modify the color node, choosing the “Environment Texture” option, as shown in figures 3 and 4.
Fig. 3: In the World Properties tab we modify the color node.
Fig. 4: We selected Environment Texture from the list.
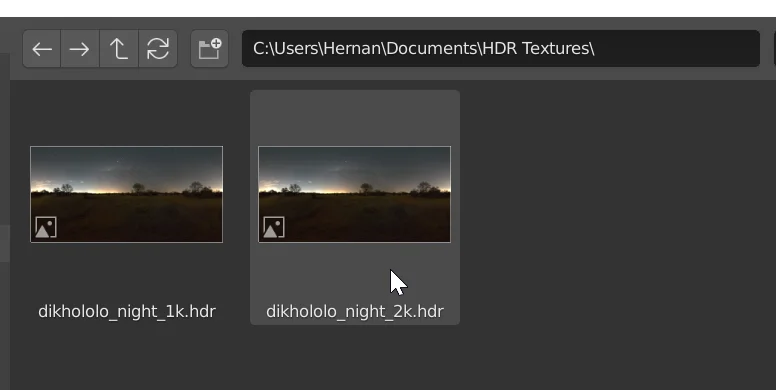
2. Using the “Open” button that appears, select the HDR texture to use as a sky.
Fig. 5: We use the Open button to open the file with the HDR texture.
Fig. 6: We selected an HDR texture, at the beginning of the article there is a link to download these kind of textures.
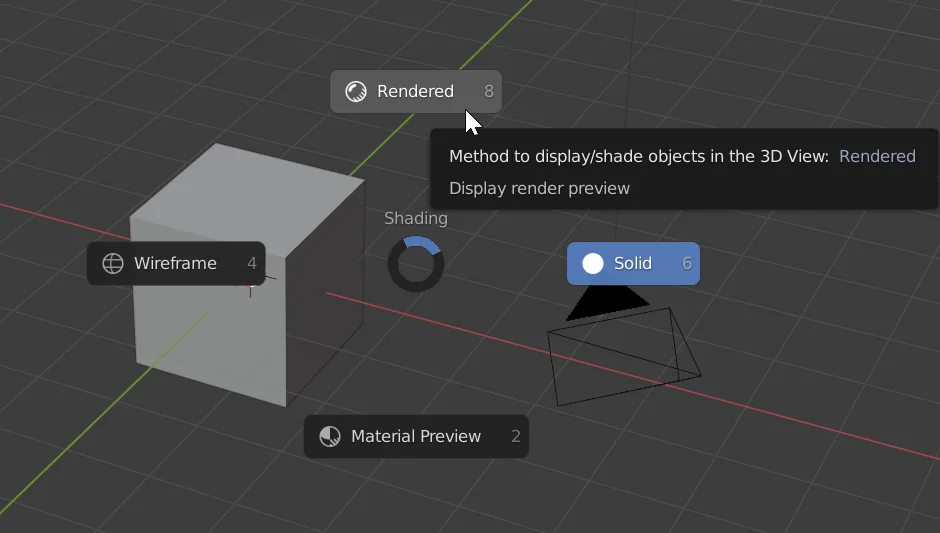
How to see the background texture
To see how the sky looks like in the scene we go to the render mode, pressing the Z key should display the options shown in figure 7, we choose the “Rendered” option.
Fig. 7: We enter the render mode to visualize the scene.
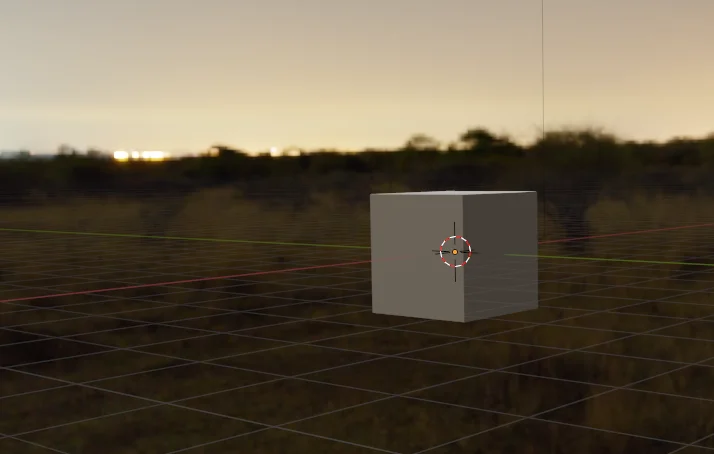
Fig. 8: The whole scene is surrounded by the selected texture.
In figure 8 we see the result, the whole scene is surrounded by the HDR texture and the lighting of the scene comes in part from this texture. We can make this more evident if we make the material reflective.
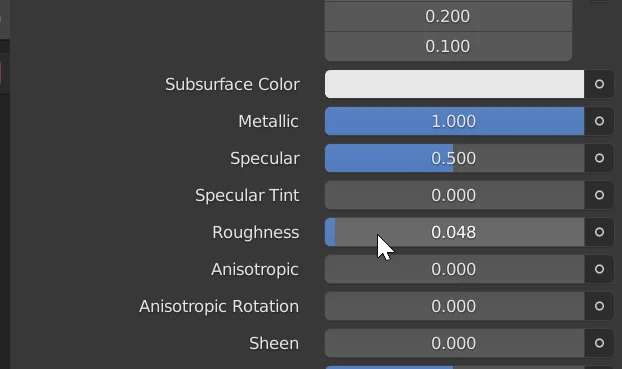
Fig. 9: In the material of the cube I decrease the roughness and make it metallic.
To do this we select the cube, go to the material tab and increase the parameter “Metallic” to the maximum and decrease the parameter “Roughness”.
In figure 10 we see the result, now the cube is metallic and has a smooth surface, therefore it reflects the light of the environment.
Fig. 10: The environment is reflected in the material because the HDR texture is being used to illuminate the scene.
Introduction
I have created a new Asset for Unity, it is a bar indicator for the Canvas. This asset will serve to show values in relation to a minimum and maximum value, for example you can make a health bar, strength bar and magic bar, a progress bar, etc. I have added several parameters and features so that you can customize it, in this article we will see the contents of the package and an example of how to make a health bar indicator in Unity.
Download this asset – Lineal indicator bar for Unity
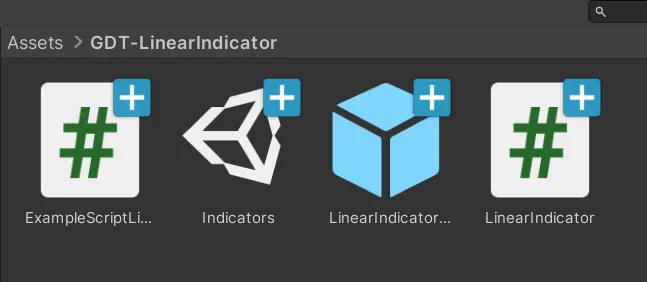
Below you can download the Unity package to import in your project, the package contains the Assets from the indicator bar. Figure 1 shows the files the package has when imported.
In the following video I explain how to use this health bar for Unity
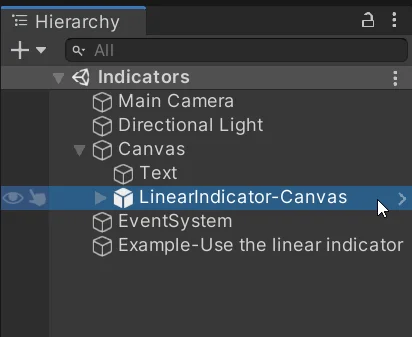
In the “Indicators” scene, the indicator bar is already assembled with an example of how to use it. In figure 2.a we see the hierarchy of the scene, the prefab of the indicator bar (third element in figure 1) must be added as a child of a Canvas object, otherwise it cannot be displayed on screen.
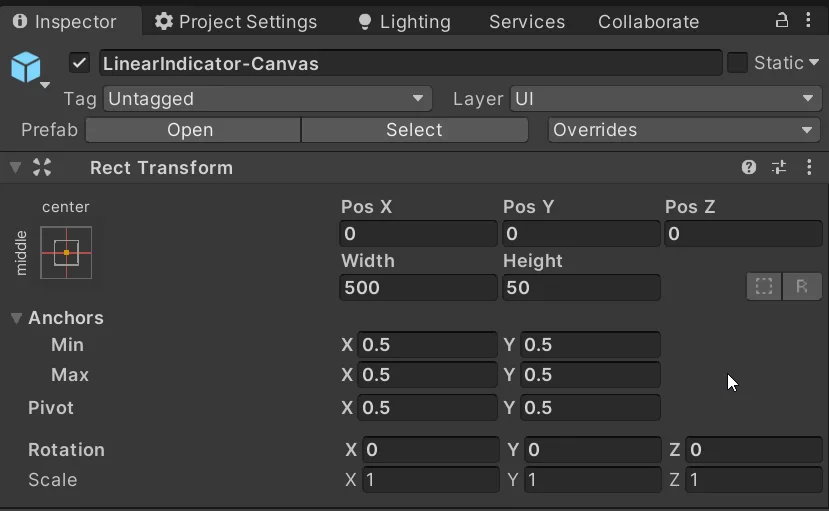
The size of the indicator bar can be adjusted by selecting the GameObject that is highlighted in figure 2.a and modifying the “Width” and “Height” values in the inspector (figure 2.b). The scale does not need to be changed.
Fig. 2.a: The prefab must be placed as a child of a Canvas object.
Fig. 2.b: To adjust the size of the indicator bar use the Width and Height fields.
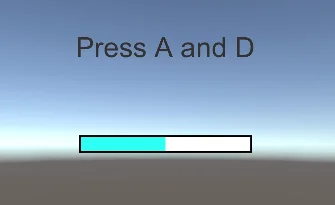
In Figure 3 you can see the indicator bar, when you enter the game mode and press the keys A and D, you should see how the bar decreases and increases its value respectively.
Fig. 3: The test indicator is assembled in the scene.
Customization parameters
In the inspector of the indicator bar prefab you can see some parameters to customize its behavior. All these values can be configured through Script, that we will see in the example below. For now we will see what purpose each of the parameters has.
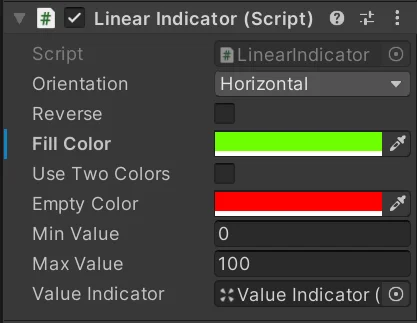
The “Orientation” parameter determines whether the indicator bar will be filled horizontally or vertically. The Boolean variable “reverse” allows you to reverse the filling direction, left to right or right to left if the orientation is horizontal and bottom to top or top to bottom if the orientation is vertical.
The “FillColor” is the fill color of the indicator bar and is the only color that will be shown, unless the “Use Two Colors” box is checked, if that box is checked, the bar will show the “FillColor” when it is at maximum and the “EmptyColor” when it is at minimum, interpolating the color for all values in between.
The values “minValue” and “maxValue” determine the range of values indicated by the bar, this will depend on what we are going to use it for.
Fig. 4: The indicator bar can be preset in the inspector.
The “ValueIndicator” object is the reference of the fill image, you don’t need to modify it, but in case you are interested, the “LinearIndicator” script, taking into account the value it has to display and the percentage that it represents according to the minimum and maximum values, will scale the “ValueIndicator” object between 0 and 1 for X if the orientation is horizontal and for Y if the orientation is vertical.
How to make a health bar at Unity
To make a life bar using this asset, you have to understand how to use it through code. The visual part is configured from the inspector, there we can modify colors, sizes and so on, but to use this indicator bar we will need a Control Script.
Assuming that you have a script that controls the player’s health, i.e. when he is hurt his life decreases, when he is healed his life increases, let’s see how to use this asset to indicate the level of health.
Step 1: Customize the appearance of the health bar
In this first step what we do is work on the visual part, that is to say being in Unity we give the size to the life bar, the position, the colors, we can change the background color, etc.
Step 2: Declaration of the indicator object to use as a health bar
Within the Script where we are going to use the indicator bar as a life bar, the first thing we need is to define a public reference for the object “LinearIndicator”, this is done in line 9 of figure 5. In case you need more than one indicator bar, for example to make a health bar and a shield bar, you must define two of these references.
Fig. 5: Definition of a LinearIndicator type object to be able to use the linear indicator
By defining the reference as public we can see it in the inspector and manually assign in that space, the GameObject of the indicator bar (in our case the one highlighted in figure 2.a), as we see in the field appears the script reference “LinearIndicator”.
Fig. 6: Assign the object with the LinearIndicator Script in the space provided in the inspector.
Step 3: Initial configuration of the health bar.
The “LinearIndicator” script has several fields and public functions defined for code-based configuration. In figure 7 we see several instructions to configure the indicator bar.
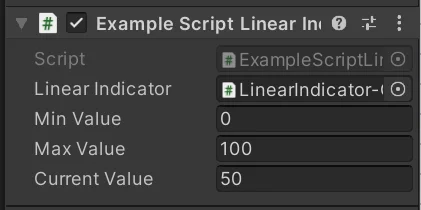
The ” SetupIndicator ” function for example (line 17 in figure 7) allows you to set the range of values of the indicator bar, for example if the player’s health is between 0 and 500, those should be the values that are passed as a parameter, that way when the player has his life in 500, the bar will be 100% full.
In line 18 we see how to change the orientation of the indicator bar, in the next line how to change the variable “reverse” that modified the filling direction.
Fig. 7: Example of configuration of the linear indicator by code.
Line 20 is not a setup instruction but the instruction to use the indicator bar, this we see in the next step.
Step 4: Using the health bar.
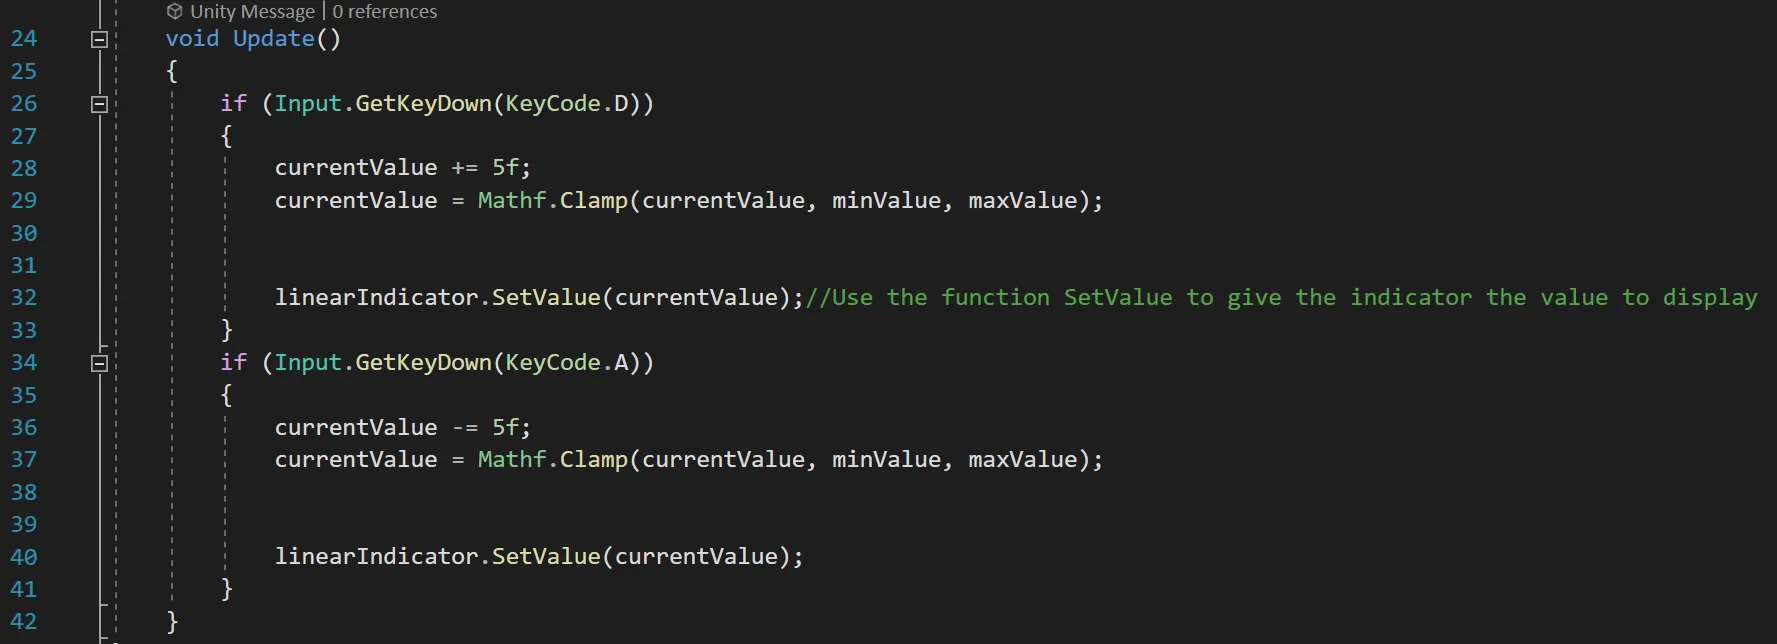
To write a value in the life bar we use the reference we define and call the function “SetValue”, passing as a parameter the value we want to indicate. We can see examples of this in line 20 of Figure 7 and lines 32 and 40 of Figure 8.
This function can be called when an event occurs that changes the value, for example when the player receives damage, at that time we refresh the value of the indicator bar. The value can also be constantly updated. Depending on how our game works.
Fig. 8: Example of using the linear indicator by code.
This website uses cookies to improve your experience. We'll assume you're ok with this, but you can opt-out if you wish. Cookie settingsACCEPT
Privacy & Cookies Policy
Privacy Overview
This website uses cookies to improve your experience while you navigate through the website. Out of these cookies, the cookies that are categorized as necessary are stored on your browser as they are as essential for the working of basic functionalities of the website. We also use third-party cookies that help us analyze and understand how you use this website. These cookies will be stored in your browser only with your consent. You also have the option to opt-out of these cookies. But opting out of some of these cookies may have an effect on your browsing experience.
Necessary cookies are absolutely essential for the website to function properly. This category only includes cookies that ensures basic functionalities and security features of the website. These cookies do not store any personal information.