Beep #2
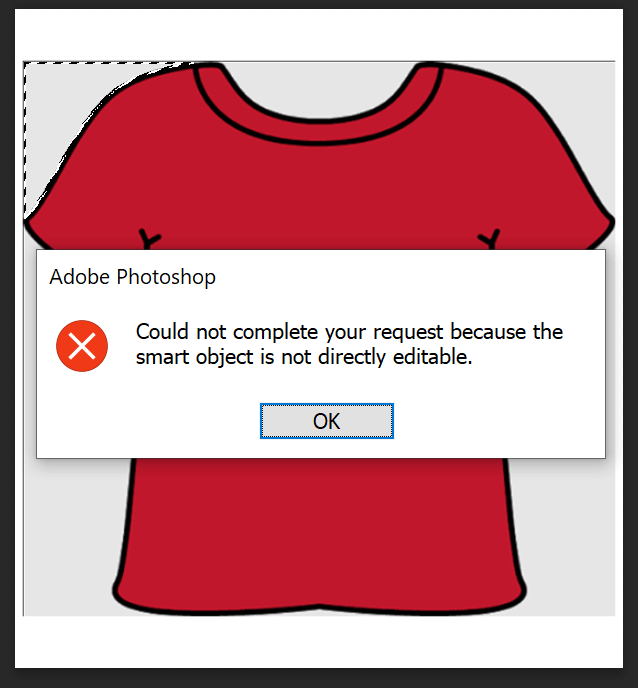
This error occurs when trying to modify a layer that is a Smart Object, usually when trying to edit an imported image that has not been rasterized. In the following images you can see the selection with the magic wand at the background of the image and in the image on the right the error message that appears when trying to remove the selected parts of the image.

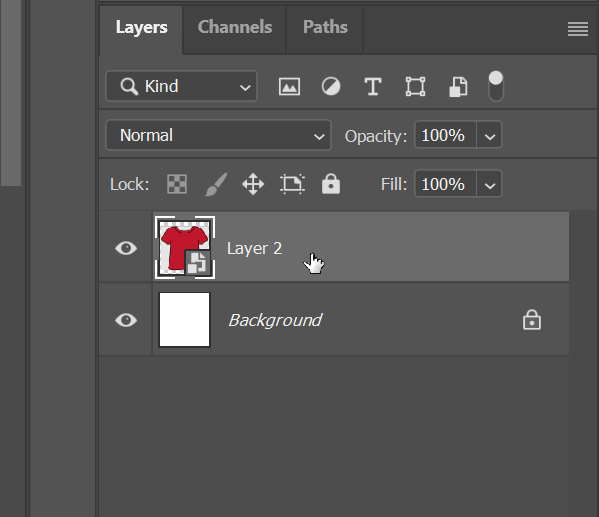
Rasterization is the process by which a vector graphic is transformed into pixels that compose the image. It is convenient to duplicate the layer and keep it hidden before rasterizing it, to keep a backup copy in case you need to make changes later. In Figure 3 the layer with the smart object to be edited is selected, note the icon in the lower right corner of the thumbnail indicating that it is a smart object.
To rasterize the layer we right click on the layer and click on the “Rasterize Layer” option shown in figure 4.

Once the layer has been rasterized, you can remove pixels from the background of the image, paint over it and perform other actions that were not directly applicable to smart objects.


In this article we are going to see how to export from Unity to Android and compile 32-bit and 64-bit versions, necessary to be able to publish a game or application on Google Play.
The following video is divided in two parts, the first 5 minutes are about how to configure the Unity engine to compile the 32-bit and 64-bit versions. The second part shows how I fixed a technical error with the message: “IL2CPP.exe did not run properly!”.

First of all we need to have installed everything we need to export from Unity to Android. In addition to Unity itself we will need 4 extra tools. Android Build Support, Android SDK, Android NDK and Java JDK.
All this can be obtained from Unity HUB when installing a new version of the engine or we can add these modules to the version we have previously installed.
Inside Unity we must make sure that these tools are configured. In the Edit > Preferences tab go to the “External Tools” section.
In case we install the tools using Unity HUB, the JDK, SDK and NDK boxes must be checked, in case we install these tools ourselves we must uncheck those boxes and indicate the paths where these tools are installed.
By default, when starting a new Android project we can export a 32-bit application, to export both architectures we must go to the window “Project Settings > Player” we can go from the Edit tab > Project Settings or from the build window (File > Build Settings).
Inside the Player window we go to the “Other Settings” section and we must change the “Scripting Backend” parameter from “Mono” to “IL2CPP”, this will enable the “ARM64” checkbox, click on this checkbox and this will allow us to create a compilation for the 64 bits architecture.
When compiling the game, I suggest using the “App Bundle” option, which will export the game in a file with .aab extension that will contain both architectures, this file can be uploaded to Google Play.
I spent a few days trying to fix the error “IL2CPP.exe did not run properly!” that came up when trying to export the game in 64-bit.
Apparently the error is due to the NDK tool, I was consulting different forums but I did not find a concrete solution.
After several days I was able to solve the problem. In the video you can see the detailed information about how I particularly solve IL2CPP.exe did not run properly error.
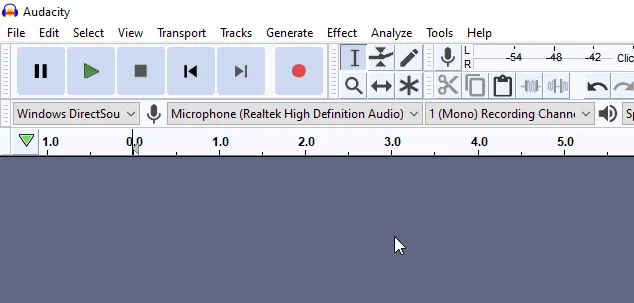
In this article I will show you how to capture sound from your PC using Audacity, a free software that allows you to record and edit sounds. Here is the link to download Audacity.
Being able to record audio from the computer in my case is very useful because it allows me to easily get sound effects, I usually search on YouTube: “sound effect of …” and then capture it quickly using this technique. It is also very useful to record a conversation or a virtual class.

In the following figure I show an example of how Audacity can be configured by default. This configuration is used to capture the audio from the microphone, but to capture the audio from the computer we must make some adjustments.
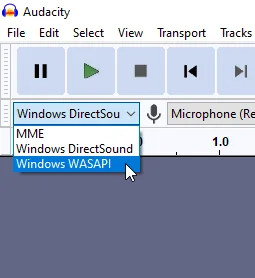
1. Select the “Windows WASAPI” option from the drop-down menu shown in figure 2.
2. Select the audio capture device, in my case the sound from the computer is output through the “Speakers” device, figure 3.

3. Change the recording mode from “Mono” to “Stereo”, this is very important since we are capturing the audio from the PC and it is an audio that has two tracks, left and right, if we leave it in “Mono” the recording WILL NOT WORK.

This should be enough, to make sure it works I usually do a test recording by pressing the speaker icon in the lower right corner and changing the volume, windows emits a sound to indicate the volume level, in figure 5 you can see this captured sound.

When we export a 3D model in FBX format in Blender, not only the geometry information is included, but also other elements are added, for example the UV map of the models, animations, materials and even the colors of the materials.
Most of the extra information defined in Blender can be recovered in other softwares, for example when we import the 3D model in Unity. However textures are not automatically included in the FBX file.
In this article you will find information and videos on how to export a 3D model with textures from Blender to Unity.

1. Select the models to be exported, making sure that they have materials with textures applied to them.
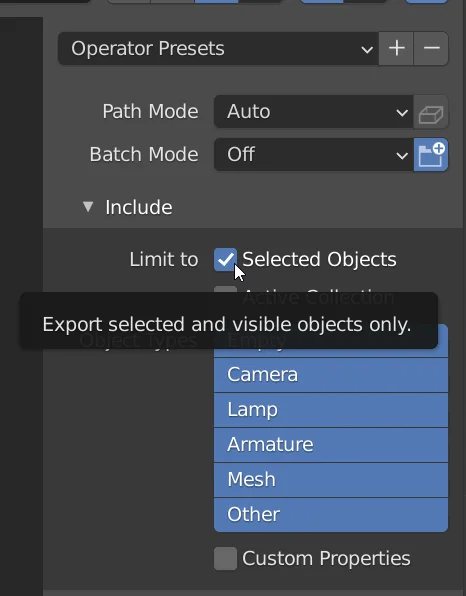
2. Go to File > Export > FBX and check the “Selected Objects” checkbox to export only the selected objects.
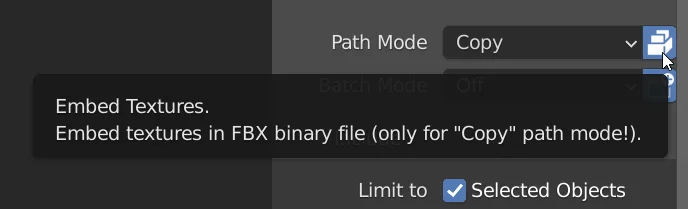
3. Change the “Path Mode” parameter to “Copy” and click on the “Embed Textures” button to the right of the “Path Mode” drop-down menu.
4. Give it a name, export and then transfer the file to Unity.
1. Select the model and in the inspector go to the materials tab. Click on the “Extract Textures” option and choose the destination folder. This will extract the textures from the FBX file and in my case they are applied automatically, but if it’s not your case you can create a new material in Unity, assign those textures and replace that material in your 3D model.
Now let’s see in detail the sequence of steps above, it consists of two parts, one part that is done in Blender and another one that is done in Unity.
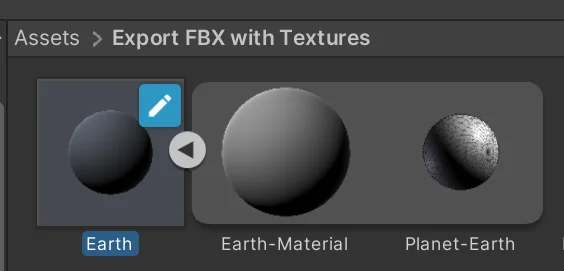
Let’s suppose we have a 3D model with textures applied like the one shown in figure 1.
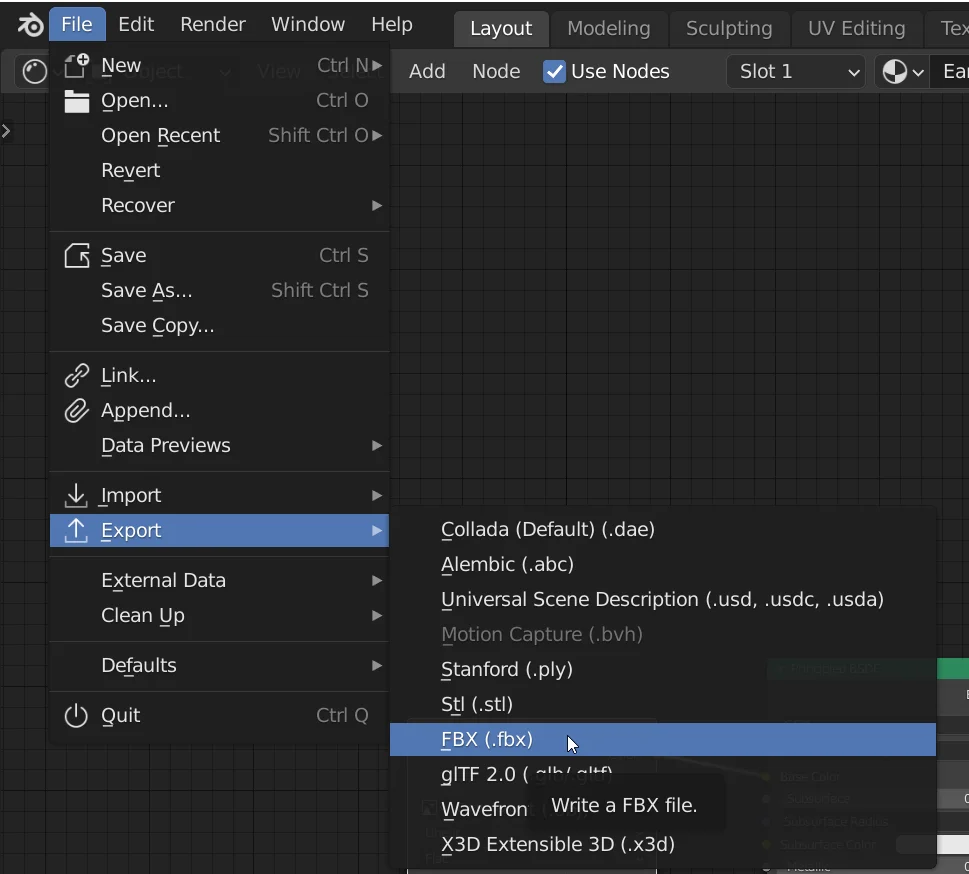
We go to the File > Export tab and choose the format, in our case we will use the FBX format to export our model. The export window will open, there we can choose the destination folder and the file name, in particular I always check the “Selected Objects” checkbox so that only the models I have selected are exported, otherwise unwanted objects, such as lights and cameras, would be exported.
In order for the textures to be included in the file it is necessary to do two things, the first is to change the “Path Mode” parameter to “Copy”, as shown in figure 4. The second thing is to activate the button on the right of the Path Mode dropdown menu (as shown in figure 5), that will embed the textures in the FBX file.

Once the model is exported with the previous method, we import that FBX file to Unity, we should see something similar to what we see in figure 6. Inside the model we only see the meshes and materials that are included, notice that the textures are still not there.
With the model selected we go to the Inspector window and enter the “Materials” tab, figure 7. Inside Materials we have a button to extract the textures, we press it and choose the destination folder in the pop-up window.
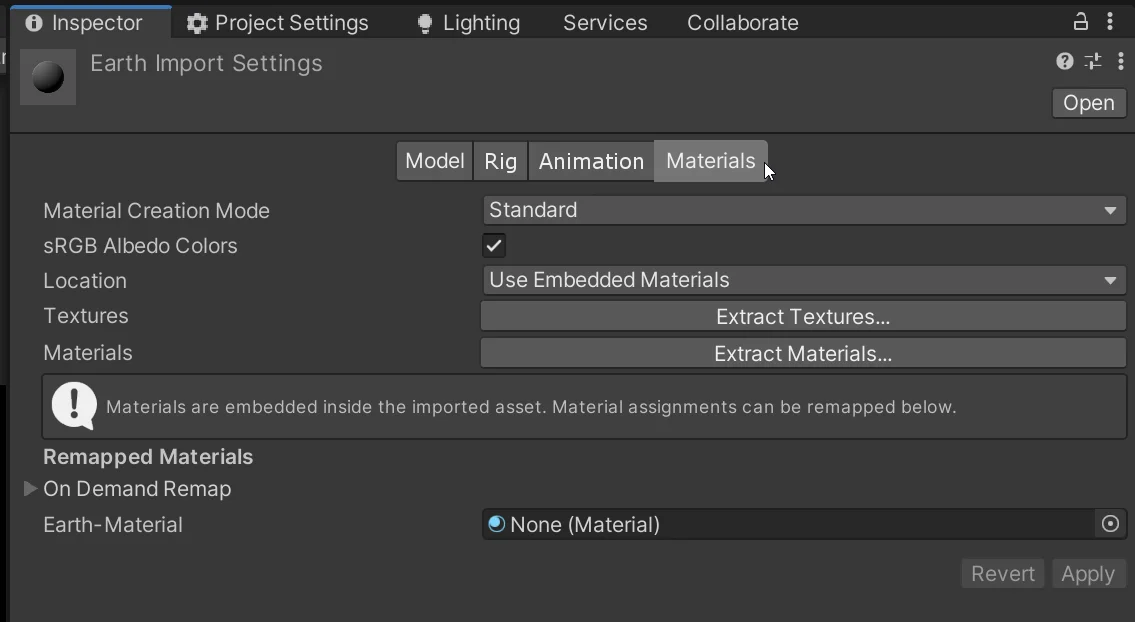
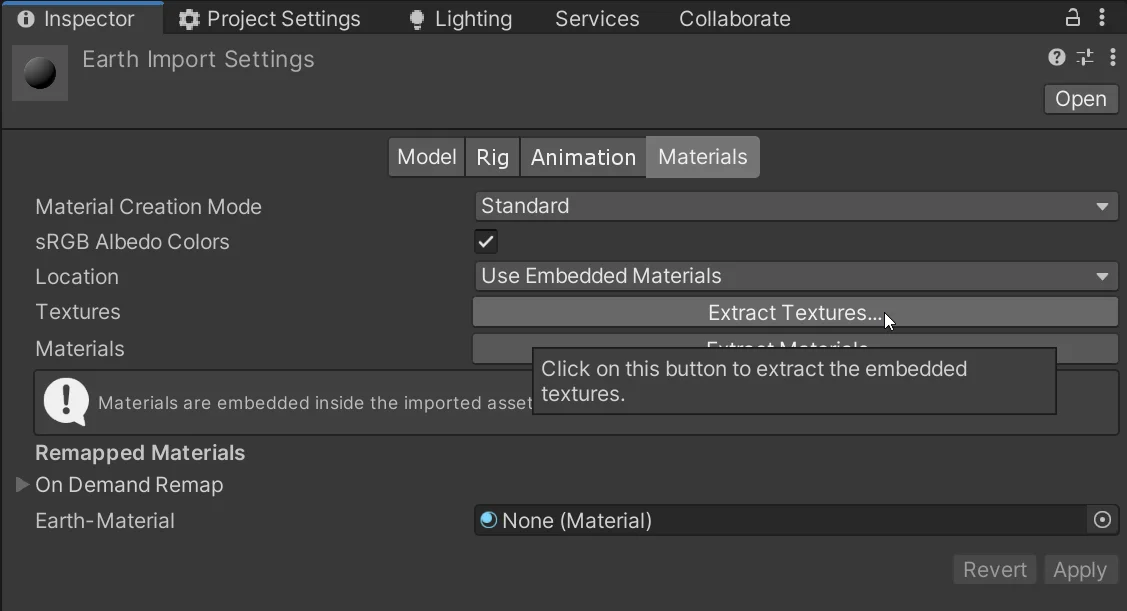
This extracts the textures that come from within the model and even applies them to the material.

This is a very specific procedure and if you are not sure that this is exactly what you need I recommend you to follow the previous video.

You have reach the end of the article, if it was useful consider subscribing to the channel!
One of the most important things we have to understand in object oriented programming is the concept of “REFERENCE”, knowing what a reference is and how to find it will allow us to manipulate any object, access its data and its public functions.
In this article we will see the concept of Reference in programming with an example in Unity. In a Script we will define a field that then we will initialize with the reference of an object and we will use it to perform some function.
I have created a playlist with videos showing different methods for finding object references, you can watch it below:

When I talk about how scripts work in my videos I use the word “REFERENCE” quite often, it is a somewhat complicated term to understand if you are just starting to study programming, since it involves knowledge of object-oriented programming, such as the concept of class, object and instance. Let’s see what a reference is in programming using the following analogy:
Let’s imagine a container where we can place a single object of some particular class, for example a box that can only contain books. We have been given the specific task of looking inside the box at some point and writing on a blackboard the name of the book that is inside it at that moment. As time goes by the box could be empty or the book inside it could change, so depending on the moment we perform our action we could observe different books or even none at all.
The important thing is that we will be able to achieve our task only if there is a book inside the container, since in that way we will be able to access it and read its name, in other words, we will be able to access that particular object and read its name (as well as access any of its data and make use of it) only if we have the reference to this object, since if the reference is null there is no object to access or read its name.
Here ends the analogy, now let’s try to take this to the programming application field, with an example in Unity.
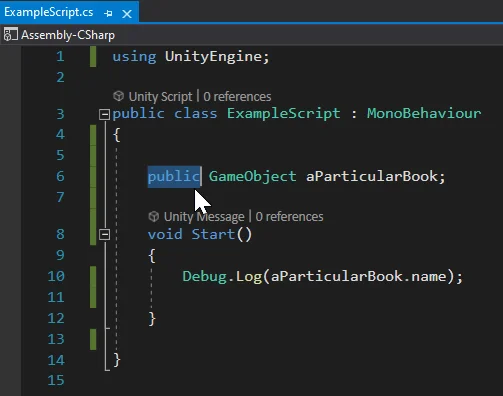
Let’s suppose that in our Script we define a variable type GameObject, with the following instruction:
GameObject aParticularBook;
As shown in the following image:
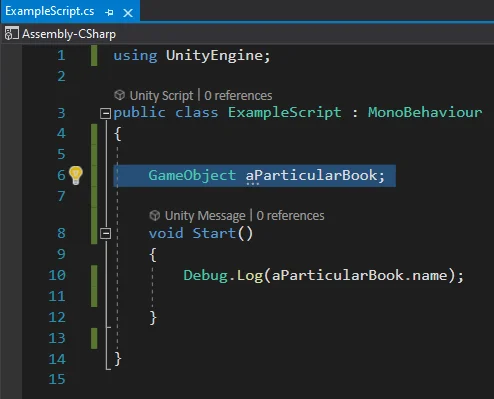
With this we are declaring a data of GameObject type, but Unity does not know who that data is, it could be any GameObject that is in the hierarchy or in the Assets folder, then what it does is to assign the value “null” to that object.
If we want to make use of the object, that is to say to access to its data or its functions, first we have to find the reference of that object in particular that we want to use, that is to say to indicate to Unity which is the object with which we are going to work. Otherwise, if we try to use that object directly without Unity knowing what object it is, i.e. it is a null object, we will get a console error of type “NullReferenceException”.
In figure 2 I place an instruction in the Start method that will print the name of the GameObject that is assigned in the field called “aGameObject”, Start is one of the first functions to be executed when entering the game mode.

For the Script to be executed it must be assigned to at least one GameObject in the hierarchy, so I choose one of them and assign the Script, in figure 3 we see the GameObject that will have the Script assigned and in figure 4 the inspector of that object where the Script is assigned.
When entering game mode, line 12 shown in Figure 2 will be executed, but since the object was not initialized and the reference is currently null, you get the message “NullReferenceException” in console:

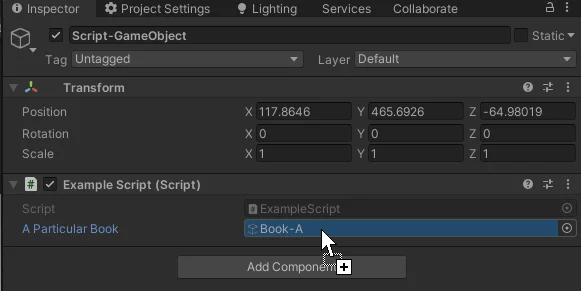
Now we are going to define the field with public visibility, this has several implications, one of them is that we will be able to visualize that field in the Unity inspector and assign the reference manually, as shown in figure 7.
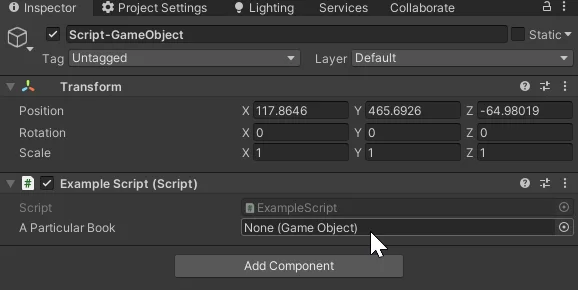
Note that also in the inspector field in Figure 7 is indicating “None” and in parentheses “GameObject”, this means that currently there is no reference assigned and also indicates the type of object that supports the field, in this case GameObject.
If we try to run the game under these conditions again we get an error message, which this time says: “UnassignedReferenceException”.

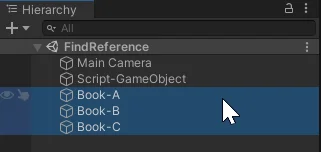
I am going to create three empty GameObjects in the hierarchy and name them as shown in Figure 9.
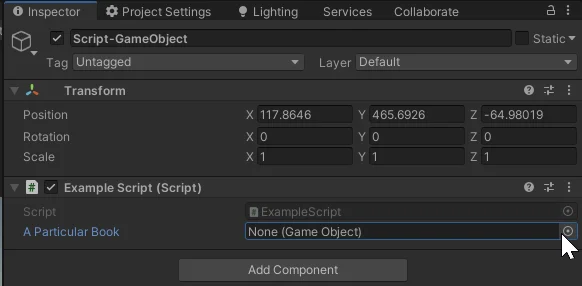
One way to assign a reference in the field that appears in the inspector is to use the button to the right of the field and then choose the object from the list, as shown in images 10 and 11.

You can also take the object from the hierarchy and drag it to the field in the inspector, as shown in Figure 12.
If we now try to run the game, we see that we no longer have errors in the console, the name of the object we have assigned is printed in the console, because we have assigned a reference in the field, if we place another object with a different name in that field the message in the console would change because we would be making reference to another object.

In the following video we see an example on how to get the reference of an object from the scene in Unity using tags, which are properties defined in all GameObjects

This solution for Unity consists of a volume control system for music and sound effects, the idea is that in a configuration window the desired levels are adjusted, the system saves that information and applies it to all the AudioSource components that are registered. To register an AudioSource component in the system just assign one of two scripts that come in the package, one is assigned if it is a music AudioSource, the other if the AudioSource is a sound effect AudioSource. The system will register all these AudioSources, adding those that are created and removing those that are destroyed. In addition, as the system saves the configuration set by the user, when starting the game these saved volumes will be applied.
In the download package there is a scene in which the system is assembled.
In the package comes a Script called AudioSettings, this Script has to be present in the scene, in my case I put it in an empty GameObject called “AudioSettings”, in the inspector you will see the current values of music volume and sound effects and the amount of registered AudioSources, but these values are only to know what is happening inside the system, writing values in those fields will not affect anything.
In a certain scene we will have several AudioSource components that will produce sounds. To register these AudioSources it is necessary to assign a Script to the same GameObject that has the AudioSource, which is in charge of initializing these objects and integrating them to the system, the scripts are: “MusicAudioSource” and “SFXAudioSource”, just by assigning one of these scripts the system takes care of integrating them, load the appropriate volume and modify the volume when there is a change in the configuration, no matter if the object with the AudioSource exists before entering the game mode or is instantiated through a Prefab (as long as we put the Script in the Prefab). We can check this by looking at the AudioSettings script inspector, which tells us how many AudioSources of each type are registered.
In the scene comes a small Canvas containing two control Sliders, one for the volume of the music and one for the volume of the sound effects. These Sliders have to execute the appropriate dynamic volume change functions that are defined within the AudioSettings Script (see the “OnValueChanged” event of each Slider).
To make the Slider initially show the volume values with which the system is loaded, you must have the “UIElementInitializer” Script assigned and select the type of element it is, in this case we will have only two elements: “MUSIC_Slider” and “SFX_Slider”, but you can extend this system to initialize any type of element of the user interface you want, simply by adding elements to the enum inside the Script and adding cases inside the Switch defined in the Start function.
This would allow you to have volume control sliders in different scenes and have them all affect the same settings.
In this article we see how to generate a standalone version of our project for Windows, that is to say a program that can be executed without the need to have the Unity engine opened, this is the final result we are looking for, a version of the game or application that can run on any computer of the platform for which it was compiled.
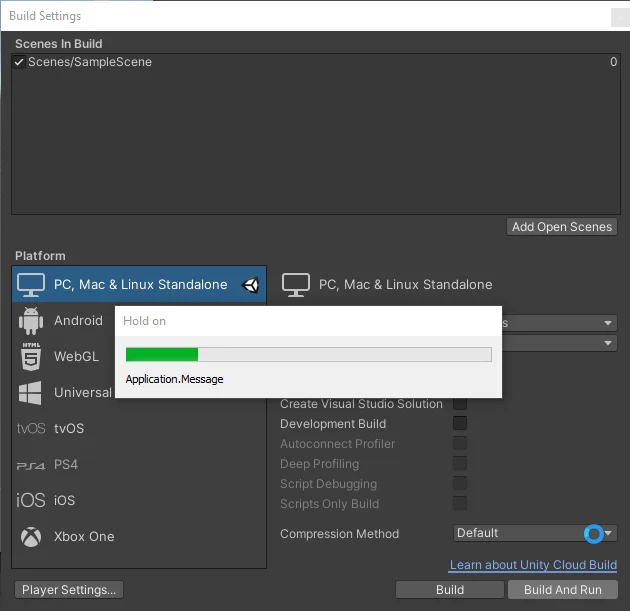
We start by going to the File > Build Settings tab, this will open the “Build Settings” window shown in Figure 1. Here we can configure some compilation parameters, such as the scenes to be added and the target platform.
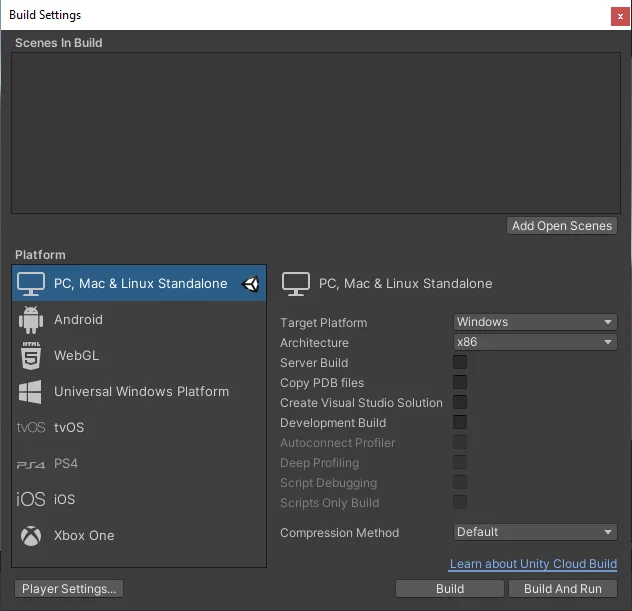
Let’s click on the “Add Open Scenes” button to add the current scene to the compilation (a blank scene that comes by default). The scene placed in position 0 will be the one loaded at startup, so if we have multiple scenes we will have to reorder them accordingly.

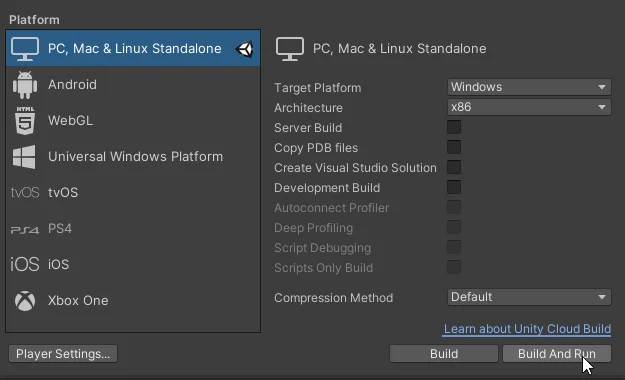
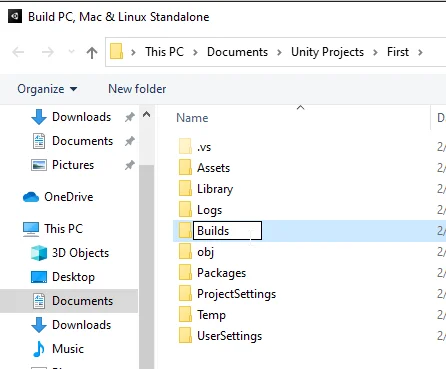
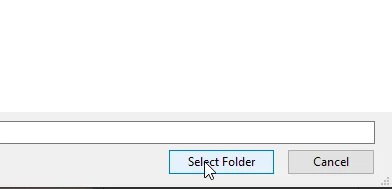
The next step is to click on the “Build and Run” button, this will display a window in which we will select the destination folder to export the files of the game or application. In my case I usually create a folder called Builds in parallel to the Assets folder of the project itself, but you can choose any folder you want, make sure you remember where it is located so you can use the files later.
When we have chosen the destination folder we click on “Select Folder” to confirm.
At this point the compilation process begins, which will take more or less time depending on factors such as the complexity of the project, the target platform and the hardware of our computer.
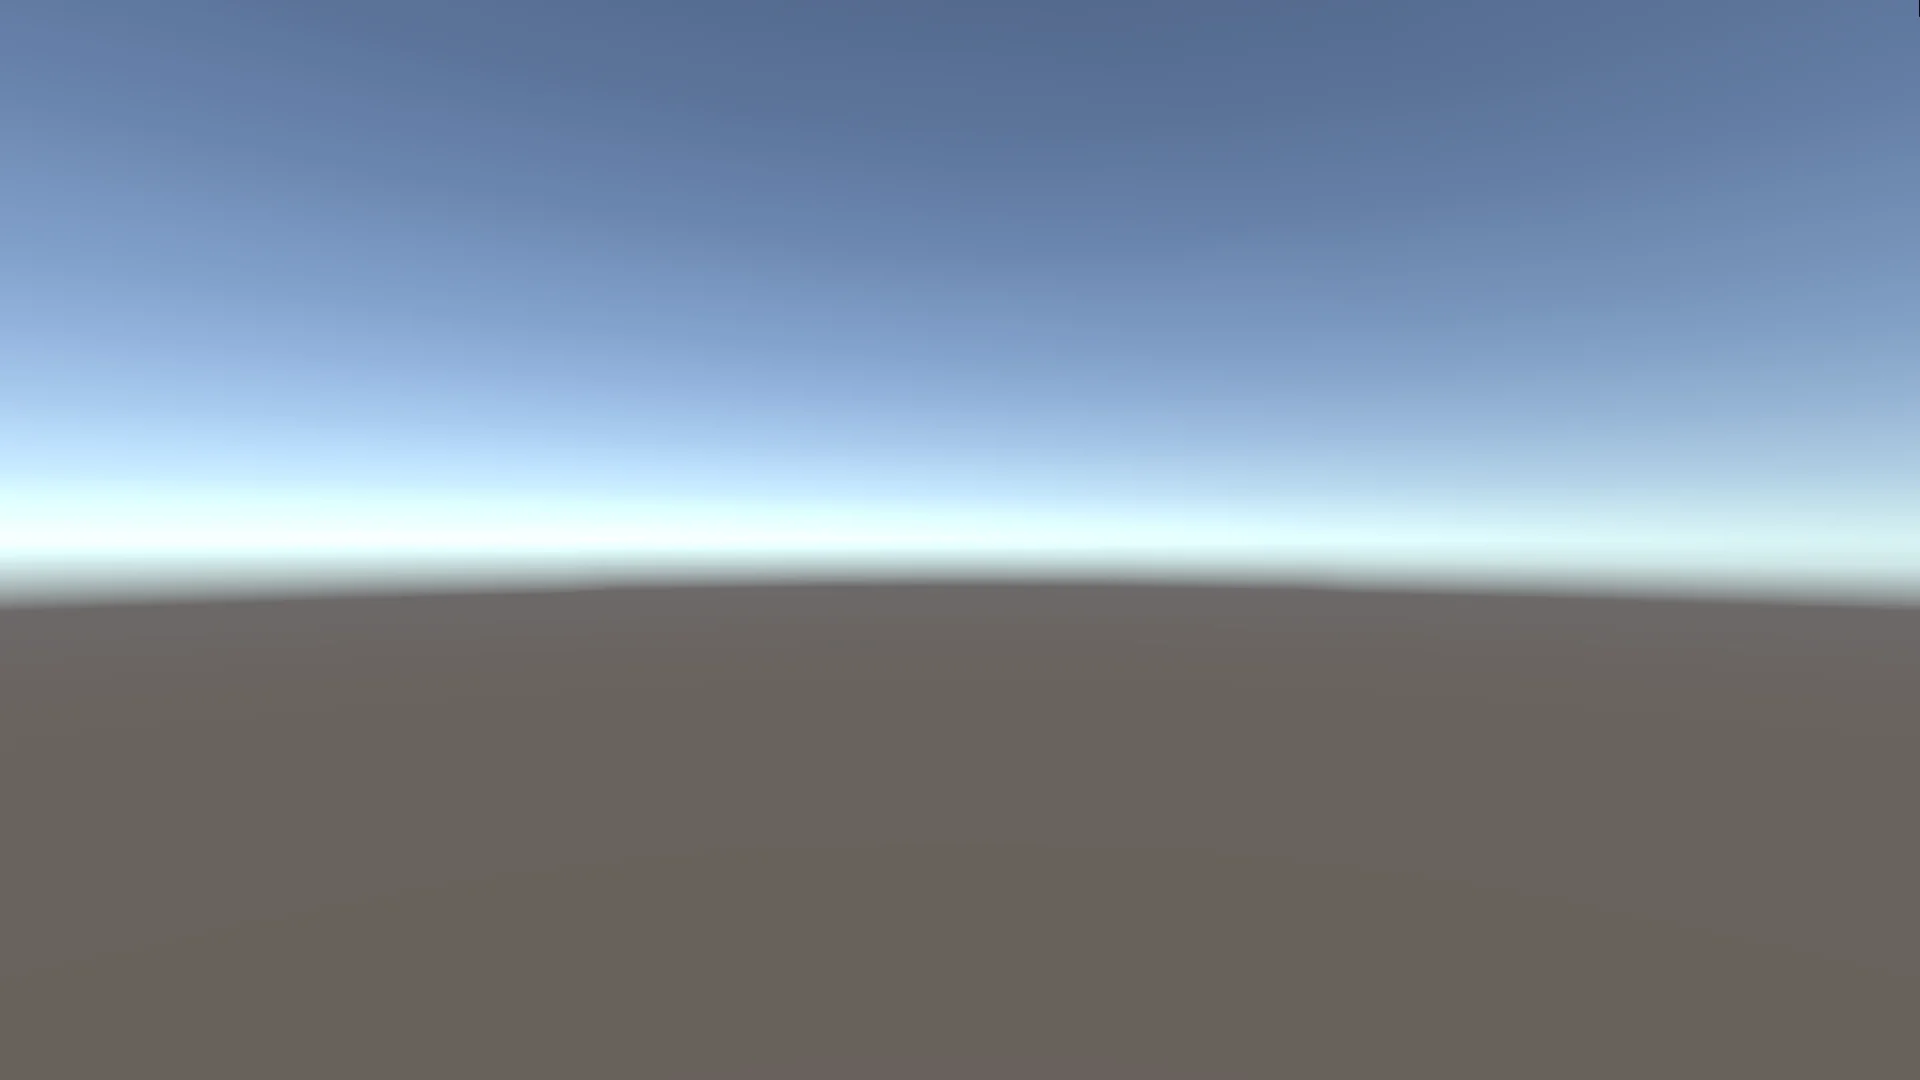
When the compilation process finishes the application opens automatically, in figure 7 we can see it, in this case it is simply a blank scene.
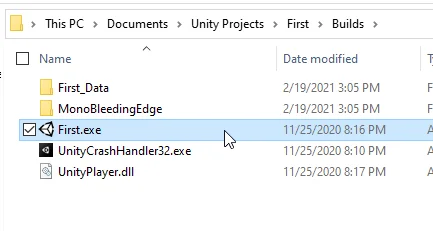
If we go to the folder that was chosen for the compilation we will find the game or application files (figure 8). These files can be shared and will work on other computers that use the platform for which it was exported and meet the minimum hardware requirements.
The first step is to install the Unity engine and the necessary tools to start developing video games and applications. In this article we will review the fundamental steps to install and configure the Unity engine, and we will also make a “standalone” compilation for Windows, that is, a version of the project that can be executed without the Unity engine.
Unity HUB is an application that allows us to manage the different versions of Unity, its modules and the projects we do. Unity HUB can be downloaded by clicking on this link. The following image is a screenshot of the previous link, clicking on the “Download Unity Hub” button starts the download of the application.

Once Unity HUB is installed, open it and go to the “Installs” section, as shown in figure 2.
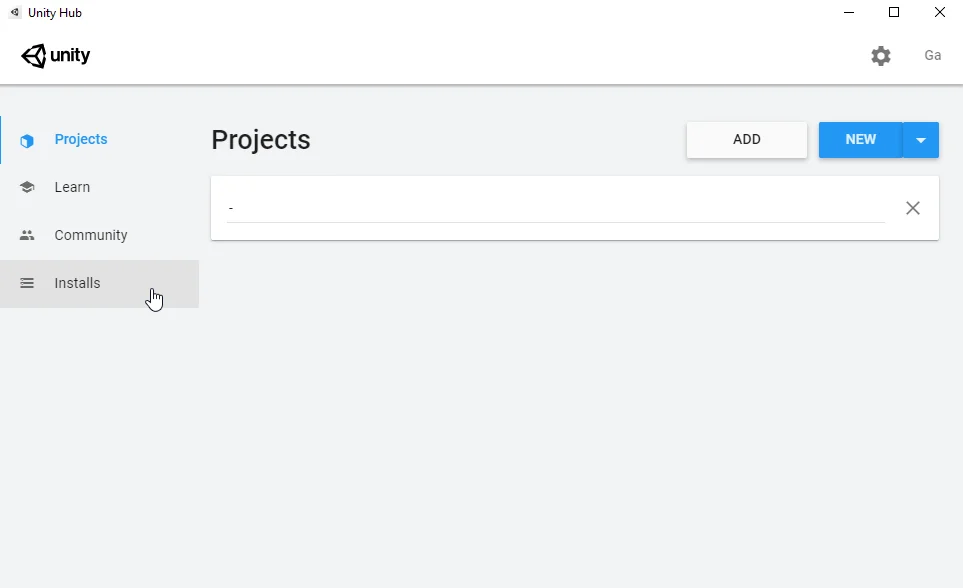
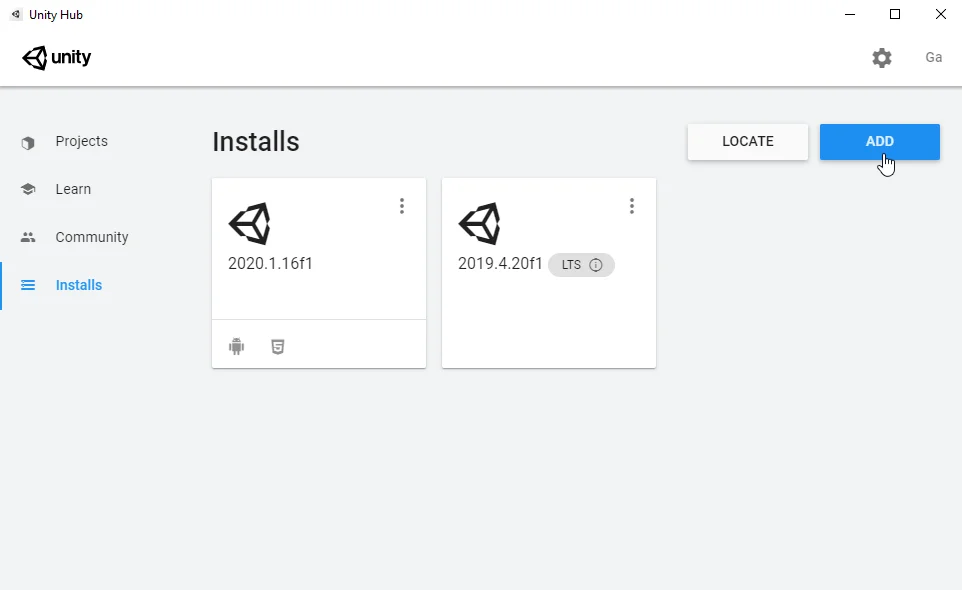
The “Installs” section contains the already installed versions of the engine, we can remove them, add modules and also add new versions of Unity using the “Add” button as shown in figure 3.
This displays a window where you can choose the engine version. The versions that have “(LTS)” are the most stable versions of the engine, I usually install the latest official version of Unity and also the latest LTS version, if it is an important project I use the latter.

Modules extend the functionality of Unity and can be added at any time, not necessarily at the time Unity is installed.
Visual Studio is the official script editor used with Unity, although other editors can be used if preferred.
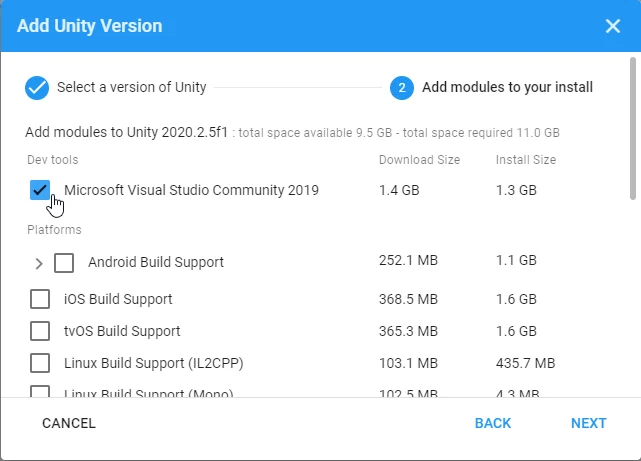
Depending on our target platform will be the modules that we have to install, by default the engine exports for the Windows operating system.
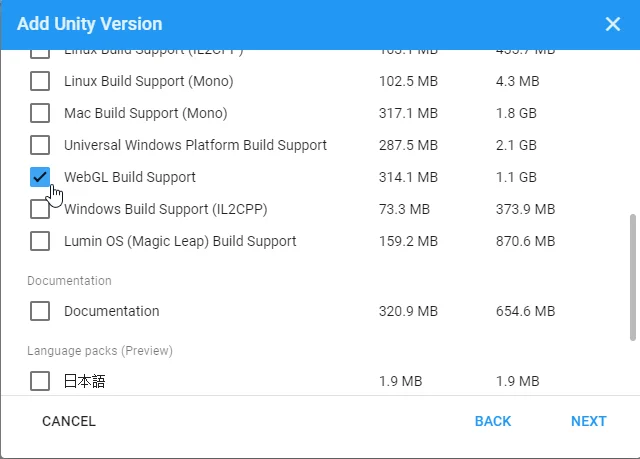
If you want to export for Android mobiles and publish games and applications on Google Play, you need the modules shown in Figure 6: Android Build Support, Android SDK & NDK Tools and the OpenJDK module. If you want to export games and applications that work in browsers, on pages such as Itch.io or on a web page of your own, you need to install the WebGL Build Support module.
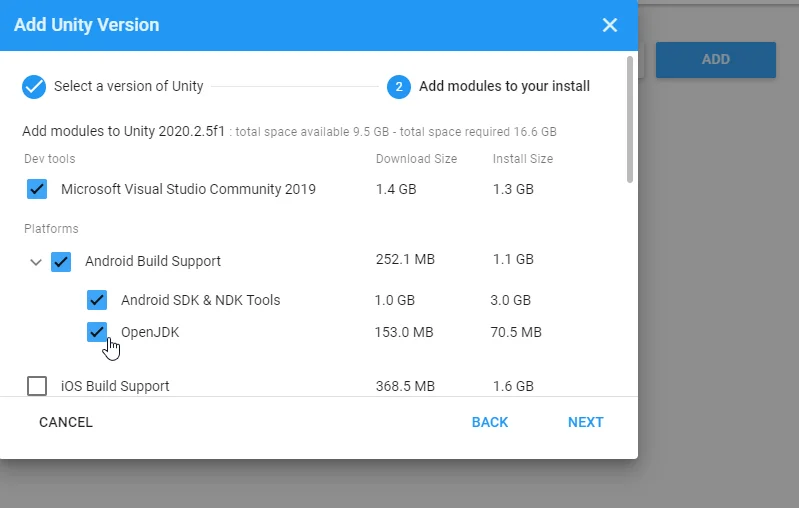
Once the modules are chosen, click the Next button, accept the terms and conditions and the installation begins.
When the installation is finished, the new version appears in the “Installs” tab (figure 3), by clicking on the three dots in the upper right corner of each version you can add new modules or delete the version.
Now if we go to the “Projects” section we can create a new project using the “New” button or the arrow on the right, this last action allows us to choose the engine version to create the new project, as shown in figure 9.


When creating a new project, the window shown in Figure 10 opens, there we can give the project a name, choose the template that best suits what we want to do, choose the location of the project files and finally create the project with the “Create” button.


In this article we see how to solve the Visual Studio error in which it does not autocomplete code, that is to say, it does not recognize the engine’s own components such as the GameObject, Component or RigidBody class, this makes the programming task very hard.
First make sure that Visual Studio is installed, if this was not done at the time of installing Unity, you can install it by going to Unity HUB, to the “Installs” section and adding the Visual Studio module to the version of the engine you are using.
If Visual Studio is installed but still does not suggest us code we have to make sure that Visual Studio is connected to Unity, for that in Unity we go to Edit > Preferences > External Tools. In the Script editor part, using the drop-down menu choose “Visual Studio” (if this option does not appear it may indicate that Visual Studio is not installed), you can also use the “Browse” option to locate the executable of the editor you want to use.
Once this is done Visual Studio will start autocompleting code related to the Unity engine, such as GameObject, Collider or RigidBody components.
In this article we look at the causes of the “Can’t Add Script” error in Unity in order to understand why it occurs and identify what actions to take to fix it.
For the absolute begginers, let’s suppose you create a new script in Unity and you name it “MyUnityScript“, when you open that script you are going to notice that there are already some text inside (for example the Start and Update functions), when new scripts are created Unity also creates a programming class with the same name that you use on the script file, in our case at the top of the script we see something like this:
public class MyUnityScript : MonoBehaviour {
So we created a script (which is a text file) called “MyUnityScript ” and Unity automatically created a class called “MyUnityScript“, that is the “class” that the error message is telling us about, Unity for some reason is not able to find it.
In most cases this error occurs because there were console errors in Unity at the time of creating the script, so Unity did not compile and did not add the script to its registry.

Unity won’t compile until you solve all the errors in the console.

This error in which we are not allowed to add a Script or component to a GameObject can arise for two reasons.
The first one is that the name of the Script, that is to say, the name of the file with extension “.cs” does not match the name of the programming class that is defined inside it. This usually happens when we create a Script and then change the name of the file without doing a Refactoring process.
To solve this problem first we must identify the Script that has conflicts, this can be done with the information provided by the “Can’t Add Script” error window that appears when we try to add the Script with conflicts to a GameObject. If you do not remember which Script produced the error, you can create an Empty GameObject and start adding each of the Scripts until the error appears.
Once we know which is the Script that generates the “Can’t Add Script” error, we open it and we locate the part of the class definition, which begins as follows:
public class NameOfTheClass …
The name of the class is the name that has to match the name of the file, so what you can do is modify the name of the class to match the name of the file, or modify the name of the file to match the name of the class.
Once this problem is solved it will be possible to add the Script to a GameObject. If you need to rename the Script the best way is to right click on the “NameOfTheClass” name and then click on “Rename”, this will make Unity modify that name in all the places where that Script is used.
We already address this cause in the introduction because I consider is the most common case, but let’s repeat, the second reason why the “Can’t Add Script” error occurs in Unity is when new Scripts are created while there are errors in console, in general these are syntax errors (errors in writing the code). The reason in this case is that if there are errors in console, Unity cannot compile, therefore if we create a new Script at this point, even if the file has been created, the programming class cannot be added to the engine, in other words Unity will not know that this Script exists until it compiles.
The solution in this case is to solve all the errors in the console, this will make Unity compile and register the new Script. Once that issue is solved you should be able to assign the Script to a GameObject.
You have reach the end of the article, if it was useful consider subscribing to the channel!
In this article, we’ll explore how to dynamically locate a specific component in Unity using C# scripting—whether it’s a built-in component like an AudioSource or Collider, or a custom script attached to a GameObject. Obtaining a reference to these components is essential for interaction, such as modifying properties or calling functions between scripts. We’ll demonstrate practical use cases, including how to access and utilize these references efficiently in your projects.
The method we’ll examine uses a C# instruction to scan all GameObjects in the hierarchy, checking each one for the specified component type. If found, it returns the component as a result, allowing you to either store it in a variable or immediately interact with it. However, if no matching component exists in the scene, the instruction returns null, which—if not handled properly—may result in a NullReferenceException at runtime.

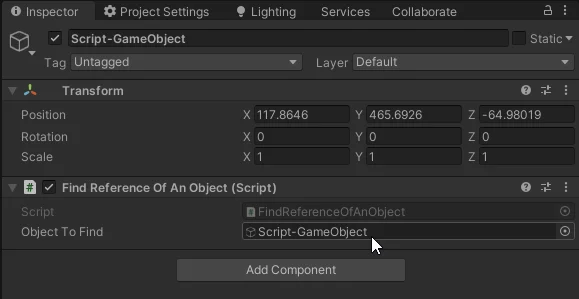
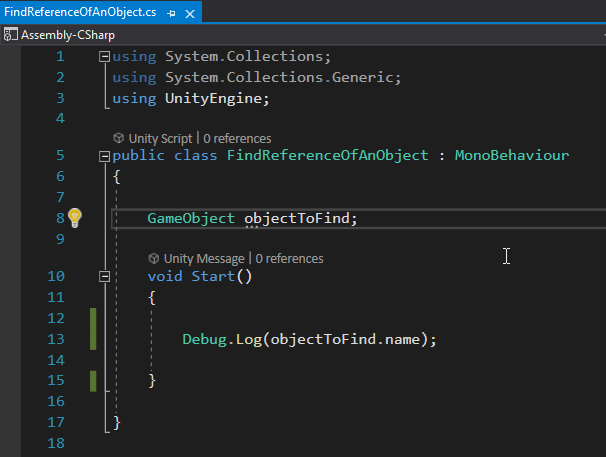
We start from a Script called “FindReferenceOfAnObject” in which we are going to find the reference of a certain GameObject that is in the scene in Unity, inside the Script we will use that reference to print its name in console with the instruction of the line 13 of the figure 1.
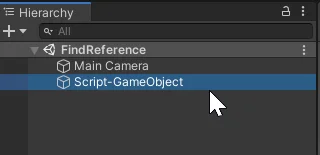
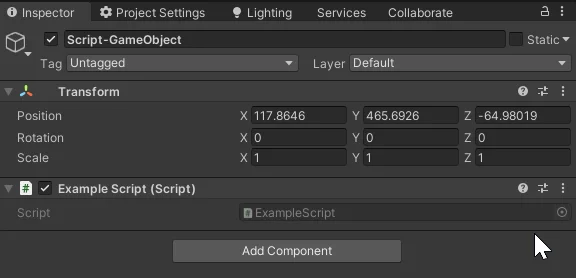
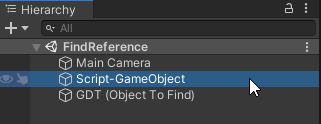
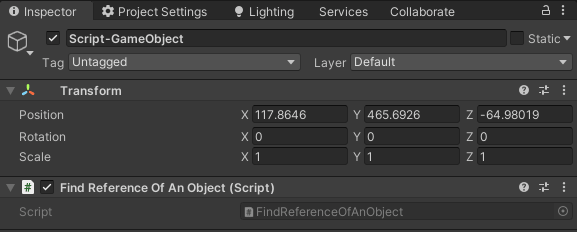
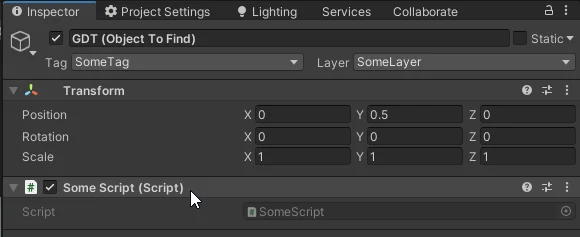
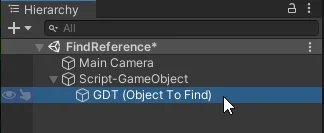
The hierarchy of the scene that we are going to use is composed by the GameObjects that are shown in figure 2, the object “Script-GameObject” is the one that has the Script in figure 1 assigned and it is the one that will be in charge of finding the references, in figure 3 you can see the inspector of this GameObject, where the Script is assigned.
The “GDT (Object to Find)” object seen in figure 2 is the object we want to find from the script, so if we succeed we should see the name of this object printed on the console.
If we know that the GameObject we are interested in finding has a specific component assigned to it, such as a “Camera”, “Rigidbody”, “AudioSource” component or a script we have created ourselves, we can use that knowledge to find the GameObject reference.
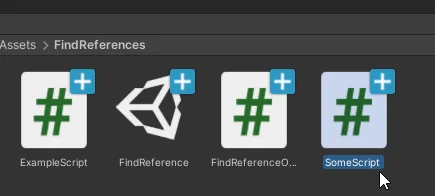
I will create a script called “SomeScript” and assign it to the GameObject we want to find, as shown in figures 4 and 5.
Using the instruction “FindObjectOfType<T>()”, where T is the type of object we are looking for (in our case it is “SomeScript” type), we can find the reference of the “SomeScript” instance that is assigned to that GameObject, then using the dot operator we can access the GameObject to which that Script is assigned.
The instruction that does all this can be seen in line 20 of figure 6.
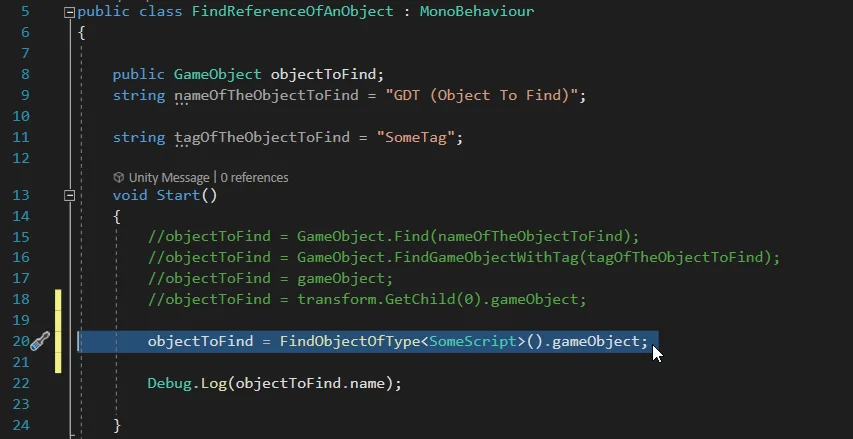
When this instruction is executed, Unity will check all the objects in the hierarchy and each one of its components until it finds a “SomeScript” type object, when it finds it it returns it as a result, but since we are interested in the GameObject to which that Script is assigned, we use the dot operator and access the “gameObject” field. If there is no object that has the “SomeScript” component assigned to it we will have a null reference error because we are using the “objectToFind” field in line 22 of figure 6.
To keep in mind, if we have more than one GameObject that has assigned the component we are looking for, Unity will return the first component that it finds in its register, in this case ambiguities could arise, we could obtain the reference of a different object to the one we want.
This article belongs to the series about finding GameObjects and Components references from the scene in Unity, in this series we will see different techniques to find from a Script any object that is in the hierarchy in a certain scene in Unity, this is something very important to understand and know how to do it because if we have the reference of an object or component, we can access it and read any public data or execute any public function we need.
Here you have the playlist about finding the references in Unity, in that list we will be adding videos with more and more specific techniques. The following video talks about the technique shown in this article:

We start from a Script called “FindReferenceOfAnObject” in which we are going to find the reference of a certain GameObject that is in the scene in Unity, inside the Script we will use that reference to print its name in console with the instruction of the line 13 of the figure 1.
The hierarchy of the scene that we are going to use is composed by the GameObjects that are shown in figure 2, the object “Script-GameObject” is the one that has the Script in figure 1 assigned and it is the one that will be in charge of finding the references, in figure 3 you can see the inspector of this GameObject, where the Script is assigned.
The “GDT (Object to Find)” object seen in figure 2 is the object we want to find from the script, so if we succeed we should see the name of this object printed on the console.
Maybe we are interested in obtaining the reference of a GameObject that we know is as a child of another GameObject whose reference we have, for example in figure 4 we see that the object to be found is as a child of the GameObject that has the script assigned to it, so if we have the reference of the father object we can access it and apply different actions on it, including accesing to its childs.
The “transform” field is another variable that is defined in all MonoBehaviour and refers to the Transform component of the GameObject to which the script is assigned.
We can use the Transformation to access the children that have that GameObject, using the GetChild() method with parameter 0 of the Transform class, this results in the transformation of the first child that has the GameObject to which this script is assigned, but as we are interested in obtaining the reference of the GameObject not its Transformation, we use the dot operator and the “gameObject” field.
The instruction is as shown in line 4 of figure 5.
This article belongs to the series about finding GameObjects and Components references from the scene in Unity, in this series we will see different techniques to find from a Script any object that is in the hierarchy in a certain scene in Unity, this is something very important to understand and know how to do it because if we have the reference of an object or component, we can access it and read any public data or execute any public function we need.
Here you have the playlist about finding the references in Unity, in that list we will be adding videos with more and more specific techniques. The following video talks about the technique shown in this article:

We start from a Script called “FindReferenceOfAnObject” in which we are going to find the reference of a certain GameObject that is in the scene in Unity, inside the Script we will use that reference to print its name in console with the instruction of the line 13 of the figure 1.
The hierarchy of the scene that we are going to use is composed by the GameObjects that are shown in figure 2, the object “Script-GameObject” is the one that has the Script in figure 1 assigned and it is the one that will be in charge of finding the references, in figure 3 you can see the inspector of this GameObject, where the Script is assigned.
The “GDT (Object to Find)” object seen in figure 2 is the object we want to find from the script, so if we succeed we should see the name of this object printed on the console.
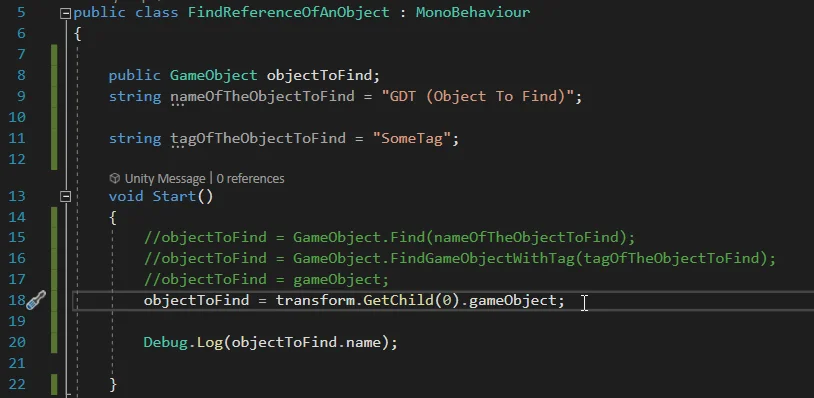
Any Script that we create that inherits from the MonoBehaviour class has inside a series of variables and functions that are already defined in the MonoBehaviour class and in the higher hierarchy classes from which MonoBehaviour inherits. In general when we create a new Script in Unity this inheritance relationship is established in this way, if you look at line 5 of figure 1, at the end ends with “: MonoBehaviour”, this tells Unity that the class that is being defined extends its behavior from the class “MonoBehaviour”, for more information on the subject I leave this article that talks about what is a class in Programming.
We can consult the Unity documentation to obtain more information about the MonoBehaviour class, there we will find all the members that are defined in that class, that is to say the variables and the functions, and also the inherited members of superior classes, in figure 4 we see a capture of the inherited variables and among them the “gameObject” and “transform” variables.
In the descriptions it tells us that: the “gameObject” variable points to the GameObject to which “this component” is assigned and says that a component is ALWAYS assigned to a GameObject. With “this component” refers to the MonoBehaviour on which you are working, in our case the Scripts that we are editing. And the variable “transform” interpreting the description tells us that it points to the Transform component of the GameObject to which this component is assigned. An important detail is that a GameObject ALWAYS has assigned at least one Transform component.
So if the GameObject that we want to use inside our Script is precisely the same GameObject to which the Script is assigned, the reference of this GameObject is already defined inside an internal field of the MonoBehaviour class, the field called “gameObject” (first letter with lowercase), this name refers to the same object to which the Script is assigned.
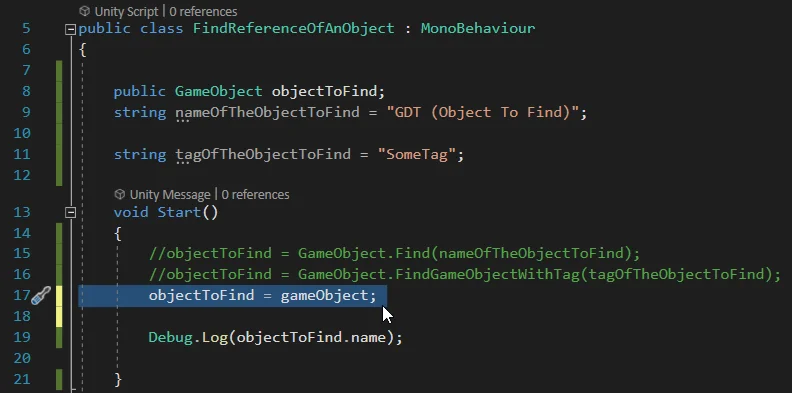
In this case it would not be necessary to define the “objectToFind” field, however we are going to initialize it as we have been doing so far. In line 17 of figure 5 we assign “gameObject” to “objectToFind”.
When entering the game mode, in figure 6 we see in the inspector that the object in the “Object To Find” field is the same object that has the Script assigned to it, you can tell because the name of the object in the “Object To Find” field is the same as the name of the GameObject (in the upper part of figure 6).