

Cooldowns are essential mechanics in game development that prevent players from spamming certain actions. Whether it’s a power movement, a healing ability, or any special action, implementing a cooldown system ensures that players must wait a certain amount of time before using an action again.
In this tutorial, you’ll learn how to create a cooldown timer in Unity using C#, implementing a complete system that controls action frequency.
In the following video I show how to create a cooldown timer in Unity with C#:

Setting Up the Scene
Before the cooldown system can be implemented, a scene with a couple of buttons, text elements, and an audio source should be prepared. For this example, a sound will be played when a button is pressed, and this action will be limited using the cooldown system.
Creating the Script
A new C# script called “CooldownExample” should be created. Once Unity has finished compiling, an empty game object named “Script_Cooldown” can be created to hold this script.
Defining the Required Variables
Two main variables need to be defined in the script to handle the audio functionality:


The first variable will hold the reference to the audio source component that will play the sound. The second variable will contain the audio clip to be played.
Since these variables are defined as public, they will appear in the Inspector. The audio source game object can be dragged from the hierarchy into the myAudioSource field. For the testSound variable, a sound from the project’s library can be selected (in this case, “WindowShutter” is used).
Implementing the Action Function
The action that will be limited by the cooldown needs to be defined. A generic function called PerformAction() can be created for this purpose:

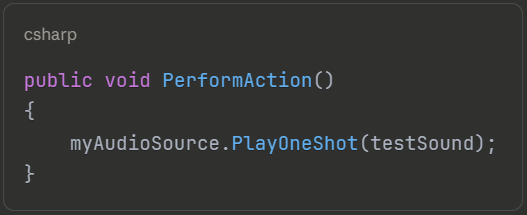
This function uses the audio source variable and calls the PlayOneShot() method, passing the test sound as a parameter. When this function is called, the sound will be played.
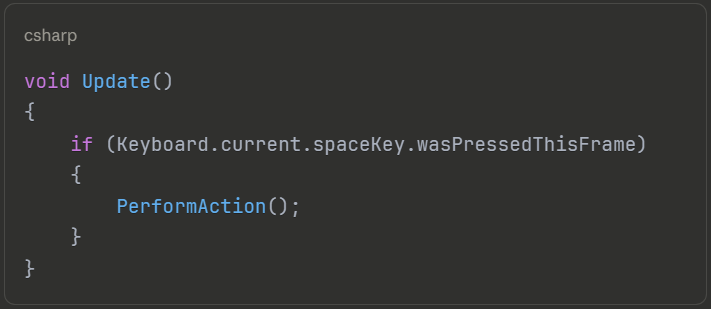
Testing the Action
The action can be tested in two ways. First, in the Update function, the spacebar input can be read:

Second, the action can be linked to a UI button. The button should be selected, and in the OnClick event, a new event should be added. The game object containing the script should be dragged into the event field, and the PerformAction() function should be selected from the dropdown menu.
This demonstrates one way to call functions between different game objects in Unity. For more advanced scenarios where you need to call a function from another script, such as triggering actions across multiple systems, additional techniques may be required.
When the scene is played, the sound can be triggered either by pressing the button or by pressing the spacebar. However, at this point, the action can be spammed without any limitations.
Implementing the Cooldown System
To create a cooldown timer in Unity, two float variables are needed:

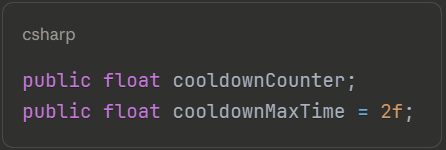
The cooldownCounter variable will be used to count the time, while cooldownMaxTime defines how long the player must wait before the action can be performed again. An initial value of 2 seconds can be assigned, though this can be modified from the Inspector later.
How to Create a Cooldown Timer Logic in Unity
The action should only be performed if the cooldown counter is less than or equal to zero. The PerformAction() function can be modified as follows:

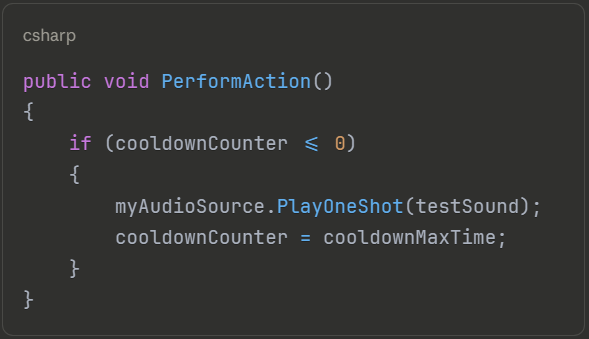
When the action is performed, the cooldownCounter is set to cooldownMaxTime. This prevents the action from being performed again until the counter decrements back to zero.
Decrementing the Counter
The cooldown counter needs to be decremented over time. This can be done in the Update function:

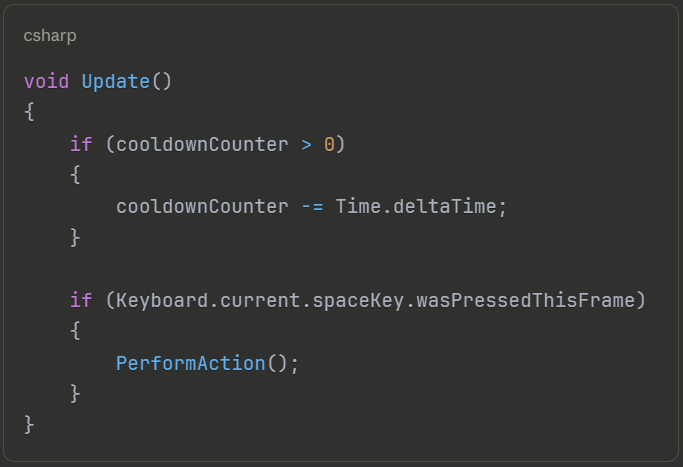
By subtracting Time.deltaTime from the counter, the variable will be decremented by one unit per second. This decrementing only occurs when the counter is greater than zero.
When the scene is played, the cooldown counter starts at zero. When the button is pressed, the counter is initialized to the max time value and decrements over time. The action cannot be performed again until the counter reaches zero. The cooldown time can be adjusted in the Inspector (for example, to 5 seconds) to test different durations.
Adding Visual Feedback
To provide visual feedback to the player, a text element can be used to display the cooldown status. A new variable should be defined:

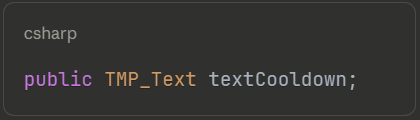
This variable needs to be assigned in the Inspector by dragging the text element into the field.
Displaying the Status
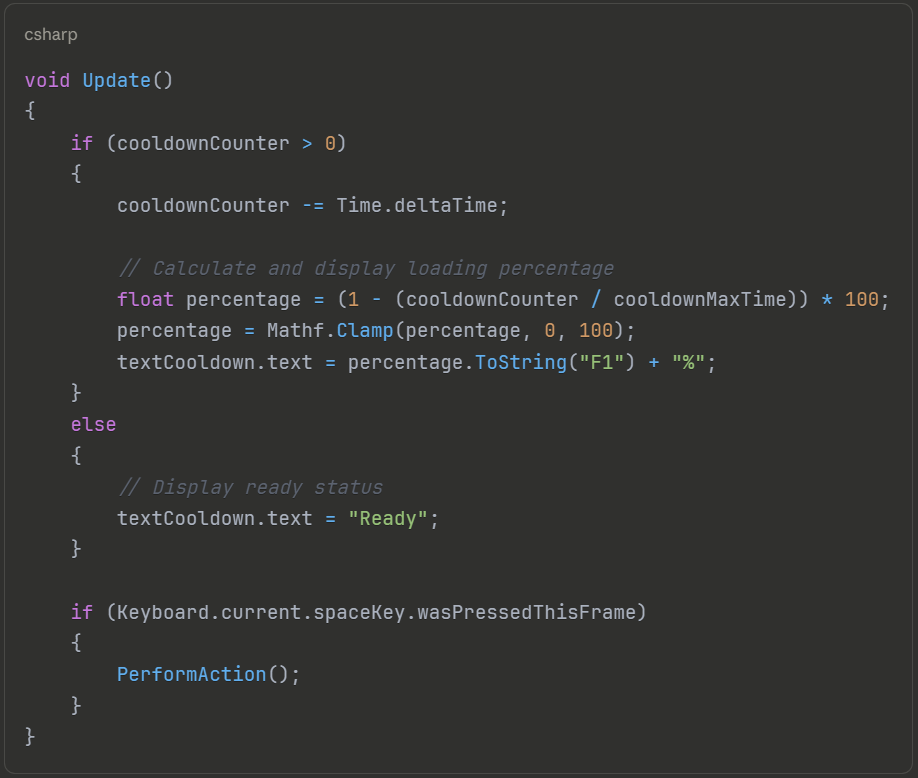
Two different messages should be displayed: “Ready” when the action can be performed, and a loading percentage while the cooldown is active.
The Update function can be modified to handle the text display:

Understanding the Percentage Calculation
The loading percentage is calculated using a mathematical formula. When the cooldown counter is divided by the cooldown max time, a value of 1 is obtained when they’re equal, and 0 when the counter reaches zero. However, since the counter is decrementing, the opposite is needed. By calculating 1 - (cooldownCounter / cooldownMaxTime), a variable that starts at zero and goes to one is obtained. This is then multiplied by 100 to get a percentage value.
The percentage is clamped between 0 and 100 using Mathf.Clamp() to ensure it stays within valid bounds. Finally, the value is converted to a string with one decimal place using ToString("F1"), and the percentage sign is appended.
Testing the Complete System
Before the scene can be tested, the text element must be assigned to the textCooldown variable in the Inspector. If this step is skipped, a null reference exception will be thrown because the script will attempt to write to an empty text variable.
Once the text has been properly assigned and the scene is played, the text will display “Ready” initially. When the button is pressed, a percentage will be shown that increases from 0% to 100% as the cooldown progresses. Once the cooldown completes, the text returns to “Ready,” indicating that the action can be performed again.
Conclusion
You’ve now successfully learned how to create a cooldown timer in Unity that prevents action spam and provides visual feedback. This system prevents action spam by requiring players to wait a specified amount of time between uses. The implementation includes both functional cooldown logic and visual feedback through a percentage display.
This cooldown system can be adapted for various game mechanics such as special abilities, healing powers, weapon attacks, or any other action that needs to be limited by time. The cooldown duration can be easily adjusted through the Inspector, and the visual feedback can be customized to match the game’s UI style.
The complete project can be found on GitHub, where it can be cloned and used as a reference for implementing similar systems in your own Unity projects.
Expanding Your Knowledge
While this tutorial focuses on creating a cooldown timer within a single script, you may want to learn how to call a function from another script to create more complex game systems where different scripts communicate with each other.