Introduction
In this article we see how to generate a WebGL standalone version of our project that can be run on browsers, that is to say a program that can be hosted on a server, for example in Itch.IO or in our own web page.
How to create a build for browsers from a Unity 3D project
We start by going to the File > Build Settings tab, this will open the “Build Settings” window shown in Figure 1. Here we can configure some compilation parameters, such as the scenes to be added and the target platform.
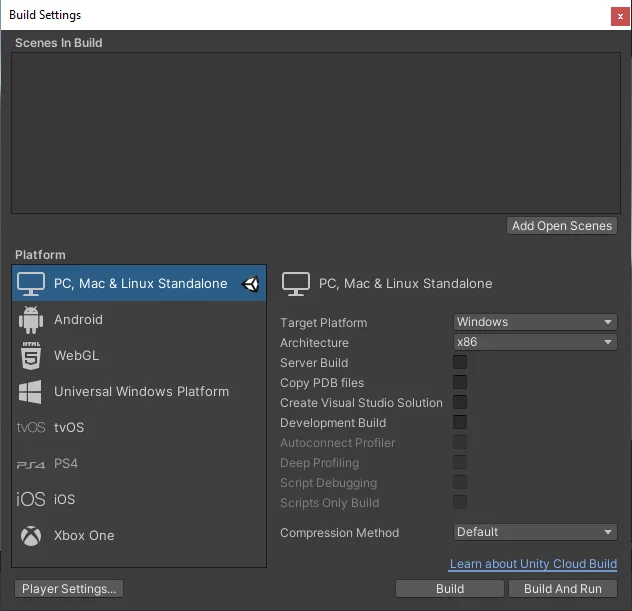
Let’s click on the “Add Open Scenes” button to add the current scene to the compilation (a blank scene that comes by default). The scene placed in position 0 will be the one loaded at startup, so if we have multiple scenes we will have to reorder them accordingly.

To generate a WebGL build for browsers, it is necessary to configure Unity to produce this kind of builds. In the “Build Settings” tab is the list of target platforms, there we must select the “WebGL” platform and then click on the “Switch Platform” button. This will start the platform switching process which may take a few minutes, this process needs to be done only once, unless we need to switch between Windows or browser builds. In general it is more comfortable to test on the operating system itself and after making several advances, produce a WebGL compilation to upload it to Itch.io or to our own web page.

Once the platform change is done, the next step is to click on the “Build and Run” button, this will display a window in which we will select the destination folder to export the files of the game or application. In my case I usually create a folder called Builds in parallel to the Assets folder of the project itself, but you can choose any folder you want, make sure you remember where it is located so you can use the files later.
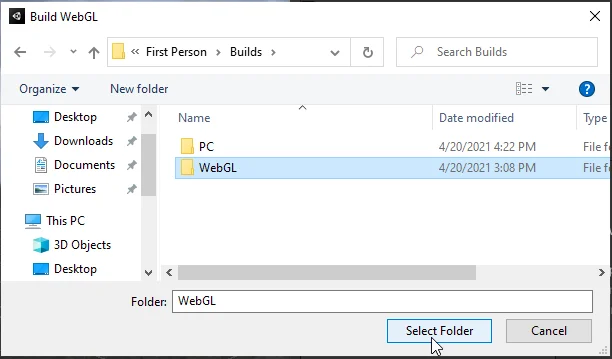
When we have chosen the destination folder we click on “Select Folder” to confirm.
At this point the compilation process begins, which will take more or less time depending on factors such as the complexity of the project and the power of our computer, in figure 5 we see the loading bar of this process.

When the compilation process finishes, as we compiled with the “Build and Run” option, the application opens automatically in our browser.
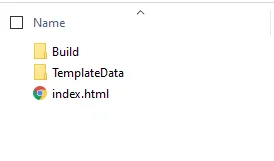
If we go to the folder that was chosen for the compilation we will find the game or application files (figure 8). These files can be uploaded to a website like Itch.IO or to your own server and the game can be loaded directly in the browser.
How to test WebGL builds made in Unity
In Figure 6 we see the folder containing the files that were generated during the compilation. The file “index.html” would be something like the executable of our game or application. The problem is that when we click on it to test we get the following message:

The message says that apparently our browser does not support the Unity WebGL compilation, it tells us to upload the content to a server or try another browser.
To test a WebGL build, the fastest way is to recompile with the “Build and Run” option, since by doing this, Unity automatically mounts a local server to run the files.
For the WebGL compilation to work it definitely has to be mounted on a server either locally, which can be mounted with applications like “Xampp”, or it has to be mounted on a web server, either from a third party, for example on a page like “Itch.IO” or on your own web server. I leave you a link to Hostinger, the server with which I have been working for years, a quality service and with very good prices, in addition to the facility to scale the hosting according to the growth of your web.
To upload the build to your own server you need to do it by FTP access, Hostinger has a built-in FTP access in the control panel, although I find it more convenient to use the FileZilla application to connect to the server.
Once access is established, the process is no different than copying files into your own PC, you create the folder where you want to put your compilation, upload the files and then the path to run the WebGL compilation is the URL from the root to the “index.html” file, which by the way you can name it whatever you want, for example “Play.html”.
Let’s look at the following example to understand the path as a URL within our server:
https://gamedevtraum.com/GDT-Prototypes/go-to-hell-5/index.html
It is a WebGL compilation made in Unity, if you click on the link you can try it. Analyzing the URL we see that the root folder is in GameDevTraum.com, from there when observing the URL we see that we get in a folder called “GDT-Prototypes”, inside that folder we enter in another folder called: “go-to-hell-5”, where finally our file “index.html”.
Another alternative to know the URL of the file “index.html” is from the FTP access, we make right click on the file and probably there is an option of “Copy URL”, which in the case of FileZilla, does not give us the exact URL, but if most of it, to that we make the necessary modifications to give us the exact URL.
Unity WebGL does not finish loading in the browser
It has happened to me that when trying to open a WebGL compilation, the browser never finishes loading it, it freezes in the Unity loading screen. I have solved this problem by removing the compression in the WebGL compilation.
To do so, go to Edit > Project Settings and the window shown in Figure 8 should open.
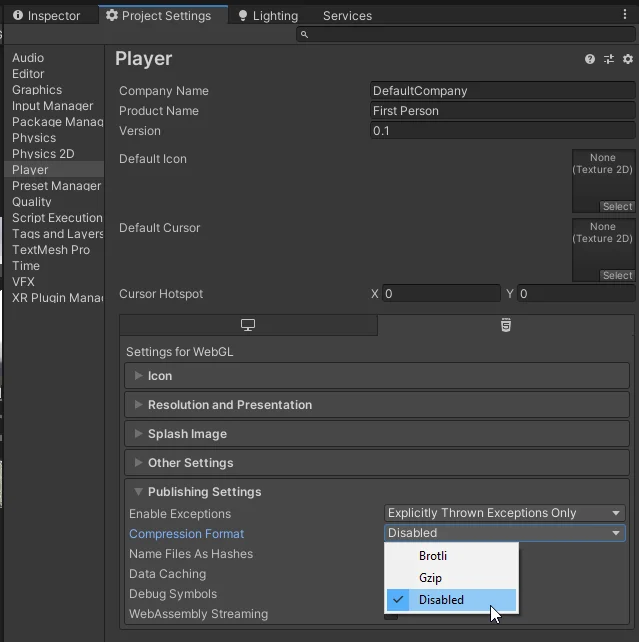
As we can see, in the left section we go to “Player” and then in the big window on the right we go to the “Publishing Settings” section, there we change the “Compression Format” field to “Disabled” and we run the compilation again. This in my case has solved the problem that a compilation of Unity for browsers does not finish loading.